Cisco Room - Bedienungsanleitung - Seite 8
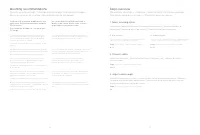

Inhalt:
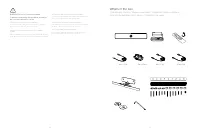
- Seite 3 – What’s in the box; Descripción general de los pasos / Conteúdo da caixa
- Seite 6 – Adjust the position and tighten the screw on the top.
- Seite 7 – Soporte de la pantalla / Montagem no ecrã
- Seite 9 – Place the vertical part on the screen and adjust the position.; peça vertical no ecrã e ajuste a posição.
- Seite 12 – power; Connectez la mediabar à l’écran,
- Seite 14 – Privacy cover; Cubierta de privacidad / Cobertura de privacidade; Instale a placa magnética autoadesiva.; Place the magnetic privacy cover.
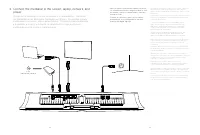
- Seite 15 – Connector panel; Panneau de connexion / Anschlussfeld / Pannello del connettore /; Troubleshooting; Solución de problemas / Solução de problemas
14
15
M6
M8
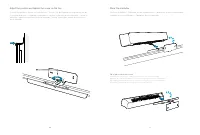
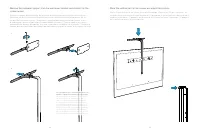
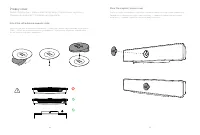
Attach the horizontal piece to your screen and tighten the thumb nuts.
Attachez la pièce horizontal à l’écran et serrez les écrous à ailettes. / Befestigen Sie das
horizontale Stück auf den Bildschirm und ziehen Sie die Muttern fest. / Fissare l’elemento
orizzontale allo schermo e serrare i dadi. / Fije la pieza horizontal en la pantalla y apriete las
tuercas. / Instale a peça horizontal no ecrã e aperte as porcas.
i
ii
iii
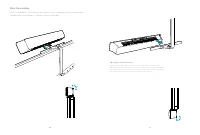
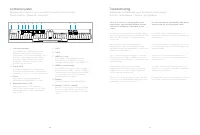
If your screen is thinner than 40 mm (1.6 in.) you must add more than one spacer. Add as many
spacers as required to align the mediabar support with the screen (see page 15).
Ajoutez plus d’une entretoise si l’écran est plus fin que 40 mm. Ajoutez autant d’entretoises que nécéssaire,
afin d’aligner le support de la mediabar avec l’écran (voir page 15). / Wenn Ihr Bildschirm dünner als 40 mm
ist, müssen Sie mehrere Abstandshalter hinzufügen. Fügen Sie so viele Abstandshalter hinzu wie erforderlich,
um die Medienleiste am Bildschirm auszurichten (siehe Seite 15). / Se lo schermo è più sottile di 40 mm è
necessario aggiungere più di un distanziale. Aggiungere un numero di distanziali sufficiente per allineare il
supporto della barra multimediale con lo schermo (vedere pagina 15). / Si su pantalla tiene un grosor inferior
a 40 mm tiene que agregar más de un espaciador. Agregue los separadores que necesite para adaptar el
soporte de la barra multimedia a la pantalla (consulte la página 15). / Se o ecrã tiver uma espessura inferior
a 40 mm, terá de adicionar mais do que um espaçador. Adicione os espaçadores necessários para alinhar a
barra de suporte da barra multimédia com o ecrã (ver página 15).
„Anleitung wird geladen“ bedeutet, dass Sie warten müssen, bis die Datei vollständig geladen ist und Sie sie online lesen können. Einige Anleitungen sind sehr groß, und die Zeit, bis sie angezeigt wird, hängt von Ihrer Internetgeschwindigkeit ab.
Zusammenfassung
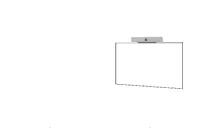
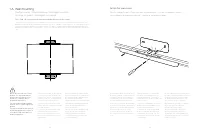
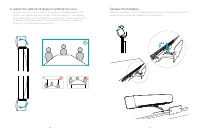
4 5 WARNING Do not to cover the mediabar To prevent overheating, the mediabar should not be covered or placed in a niche. ATTENTION à ne pas couvrir la mediabar Pour éviter toute surchauffe, la mediabar ne doit pas être couverte ou placée dans une alcôve. WARNUNG: Die Medienleiste darf nicht verdeck...
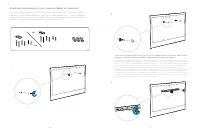
10 11 Adjust the position and tighten the screw on the top. Ajustez la position et serrez la vis du dessus. / Passen Sie die Position an und ziehen Sie die Schraube oben fest. / Regolare la posizione e serrare la vite nella parte superiore. / Ajuste la posición y apriete el tornillo de la parte supe...
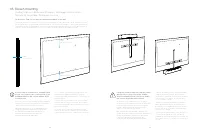
12 13 Max 7 cm / 2.75 in Max 40 cm / 15.75 in Max 40 cm / 15.75 in 1 B. Screen mounting Fixation à l’écran / Bildschirm-Montage / Montaggio dello schermo / Soporte de la pantalla / Montagem no ecrã Go directly to Step 2 if you have mounted the mediabar on the wall. Passez directement à l’étape 2 si...