Kochfeld einsetzen; General information; Read this instruction manual carefully.; Safe installation; WARNING ‒ Risk of injury! - Bosch PIV931HC1E - Anleitung - Seite 6


Inhalt:
- Seite 4 – Colocar la placa de cocción; Conectar el aparato a la red eléctrica; Combinaciones especiales; Allgemeine Hinweise; Lesen Sie diese Anleitung sorgfältig.; Sichere Montage; WARNUNG ‒ Gefahr durch
- Seite 5 – Netzkabel in die Anschlussdose verlegen
- Seite 6 – Kochfeld einsetzen; General information; Read this instruction manual carefully.; Safe installation; WARNING ‒ Risk of injury!
8
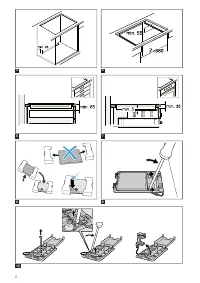
4.
Nur gemäß Abbildung an der Anschlussdose an-
schließen:
→
– BN: Braun
– BU: Blau
– GN/YE: Gelb und Grün
– BK: Schwarz
– GY: Grau
Hinweise
¡
Wenn der Anschluss gemäß Anschlussschema
3N~ erfolgt, das gelieferte 5-adrige Kabel ver-
wenden.
¡
Wenn der Anschluss gemäß Anschlussschema
1N erfolgt, das mitgelieferte 3-adrige Kabel ver-
wenden. Die Brücken entsprechend dem An-
schlussschema anordnen.
5.
Nach dem Kabelanschluss die Schrauben an der
Anschlussdose ordnungsgemäß festziehen.
6.
Das Netzkabel mit der Schlauchschelle befestigen
und die Befestigungsschraube festziehen.
→
7.
Die Kabel in den mittleren Bereich der Anschluss-
dose verlegen. Den Deckel der Anschlussdose
schließen.
8.
Wenn das Netzkabel mit der Schublade interfe-
riert, das Kabel mit dem beigefügten Kabelbinder
an der Unterseite des Kochfelds befestigen.
→
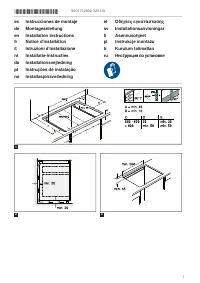
Kochfeld einsetzen
1.
Das Kochfeld im vorderen Teil der Einbaunische
anpassen.
→
2.
Das Kochfeld in den Ausschnitt einsetzen.
→
3.
Bei gefliesten Arbeitsplatten die Fliesenfugen mit
Silikonkautschuk abdichten.
Hinweis:
Das Anschlusskabel nicht knicken oder
einklemmen und von scharfen Kanten und heißen
Teilen fernhalten.
Gerät anschließen
Voraussetzung:
Die Anschlussdaten auf dem Typen-
schild beachten.
1.
Nur gemäß Anschlussdiagramm anschließen:
→
, →
– BN: Braun
– BU: Blau
– GN/YE: Gelb und Grün
– BK: Schwarz
– GY: Grau
2.
Betriebsbereitschaft prüfen: Wenn in der Anzeige
des Geräts
,
oder erscheint, ist es
nicht richtig angeschlossen. Das Gerät von der
Stromversorgung trennen und den Anschluss des
Stromkabels an das Stromnetz prüfen.
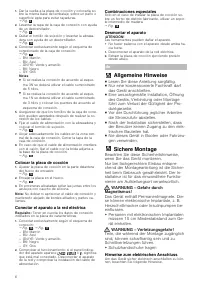
Spezielle Kombinationen
Wenn Sie das Kochfeld über einem Backofen einer
anderen Marke einbauen, einen Zwischenboden aus
Holz verwenden.
→
Gerät demontieren
ACHTUNG!
Werkzeuge können das Gerät beschädigen.
▶
Nie das Gerät von oben heraushebeln.
1.
Das Gerät vom Stromnetz trennen.
2.
Das Kochfeld von unten herausdrücken.
en
General information
¡
Read this instruction manual carefully.
¡
Only a licensed expert may connect the
appliance.
¡
Improper installation, opening of the appli-
ance, connection or assembly may lead
to a loss of validity of the product war-
ranty.
¡
Switch off the power supply before carry-
ing out any work.
¡
After installation, ensure that the user
does not have access to the electrical
components.
¡
Never use this appliance in boats or in
vehicles.
Safe installation
Follow these safety instructions when in-
stalling the appliance.
The appliance can only be used safely if it
is correctly installed in accordance with the
installation instructions. The installer is re-
sponsible for ensuring that the appliance
works perfectly at its installation location.
WARNING ‒ Danger: Magnetism!
The appliance contains permanent mag-
nets. They may affect electronic implants,
e.g. pacemakers or insulin pumps.
▶
Persons with electronic implants must
stand at least 10 cm away from the appli-
ance.
WARNING ‒ Risk of injury!
Parts that are accessible during installation
may have sharp edges and may lead to cut-
ting injuries.
▶
Wear protective gloves
Instructions for the electrical connection
In order to safely connect the appliance to the elec-
trical system, observe the following instructions.
¡
Only an authorised expert or a specially trained
service technician may connect the appliance. The
person must be approved in accordance with the
local regulations of the country and the electricity
supply company.
¡
Connect the appliance to a fixed installation and
set up appropriate isolating switches in accord-
ance with the installation regulations.
¡
The manufacturer shall assume no liability for mal-
functions or damage resulting from incorrect elec-
trical wiring.
¡
The highest permissible impedance of the elec-
trical connection is 0.355 ohms + 706 μH
Connection type
¡
The appliance corresponds to protection class 1.
You should therefore only use the appliance with
a protective earth connection.
„Anleitung wird geladen“ bedeutet, dass Sie warten müssen, bis die Datei vollständig geladen ist und Sie sie online lesen können. Einige Anleitungen sind sehr groß, und die Zeit, bis sie angezeigt wird, hängt von Ihrer Internetgeschwindigkeit ab.
Zusammenfassung
6 1. Dar la vuelta a la placa de cocción y colocarla so-bre la misma base del embalaje, sobre un paño osuperficie apta para evitar rayaduras.→ Fig. 8 2. Levantar la tapa de la caja de conexión con ayudade un destornillador.→ Fig. 9 3. Quitar el tornillo de sujeción y levantar la abraza-dera con ay...
7 ¡ Nur ein autorisierter Fachmann oder ein speziellausgebildeter Servicetechniker darf das Gerät an-schließen. Die Person muss gemäß den örtlichenVorschriften des Lands und des Elektrizitätsversor-gungsunternehmens zugelassen sein. ¡ Das Gerät an einer festen Installation anschließenund entsprechen...
8 4. Nur gemäß Abbildung an der Anschlussdose an-schließen:→ Abb. 11 – BN: Braun– BU: Blau– GN/YE: Gelb und Grün– BK: Schwarz– GY: Grau Hinweise ¡ Wenn der Anschluss gemäß Anschlussschema3N~ erfolgt, das gelieferte 5-adrige Kabel ver-wenden. ¡ Wenn der Anschluss gemäß Anschlussschema1N erfolgt, das...