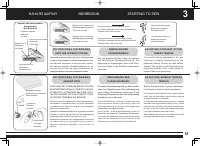
Seite 4 - DIE HAUPTTEILE DER
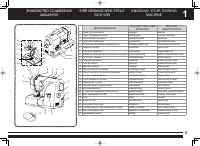
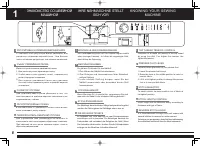
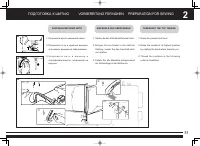
11 1 IHRE NÄHMASCHINE STELLT SICH VOR KNOWING YOUR SEWING MACHINE 5 DIE HAUPTTEILE DER MASCHINE MACHINE IDENTIFICATION 1 Tragegriff Handle 2 Nähfußhebel Presser foot lever 3 Garnrollenhalter Spool pin 4 Typenschild Identi fi cation plate 5 Oberfadenspannung Thread tension contr...
Seite 6 - DAS AUFSTELLEN DER MASCHINE
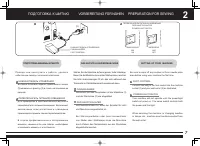
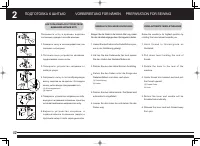
11 2 VORBEREITUNG FÜR NÄHEN PREPARATION FOR SEWING 7 DAS AUFSTELLEN DER MASCHINE SETTING UP YOUR 摹 MACHINE , . Stel len Sie die Maschine auf eine gerade, feste Unterlage. Bevor Sie die Maschine zum ersten Mal benutzen, wischen Sie bitte überschüssiges Öl ab, das sich während des Tran...
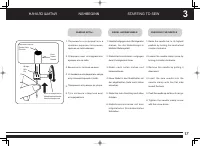
Seite 7 - H E R A U S N E H M E N D E R
11 2 VORBEREITUNG FÜR NÄHEN PREPARATION FOR SEWING 8 1 2 3 H E R A U S N E H M E N D E R SPULENK APSEL REMOVING BOBBIN CASE FROM SHUTTLE , . , . , . , , . , , . 1. 2. 3. Entfernen Sie den Anschiebetisch von der Masc hine. Br ingen Sie die Na...
Seite 8 - WINDING BOBBIN
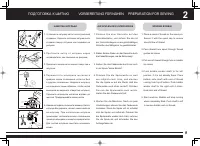
11 2 VORBEREITUNG FÜR NÄHEN PREPARATION FOR SEWING 9 5 1 2 3 4 WINDING BOBBIN AUFSPULEN DES UNTERFADENS 1. 2. 3. 4. 5. , . . , . . , . , . . . , . , , . . . Pull end of thread through hole in bobbin...
Seite 10 - EINFÄDELN DES OBERFADENS
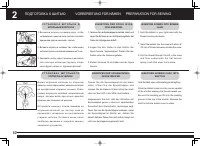
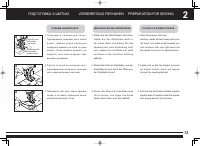
11 2 VORBEREITUNG FÜR NÄHEN PREPARATION FOR SEWING 11 1 2 3 EINFÄDELN DES OBERFADENS THREADING THE TOP THREAD 1. 2. 3. . , . , . 1. 2. 3. Stellen die den Füßchenlüfterhebel hoch. Br ingen Sie die Nadel in die höc hste Stellung, indem Sie das Handrad nach vorn drehen. Fädel...
Seite 11 - GEBRAUCH DES NADELEINFÄDLERS
11 2 VORBEREITUNG FÜR NÄHEN PREPARATION FOR SEWING 12 4 1 2 3 5 6 GEBRAUCH DES NADELEINFÄDLERS USING AUTOMATIC NEEDLE THREADER , . Bringen Sie die Nadel in die höchste Stel lung, indem Sie das Handrad entgegen dem Uhrzeigersinn drehen. Raise the needle to its highest position by...
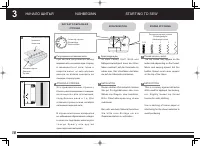
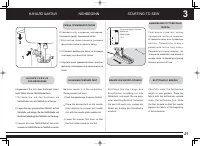
Seite 12 - HERAUFHOLEN DES UNTERFADENS
11 2 VORBEREITUNG FÜR NÄHEN PREPARATION FOR SEWING 13 1 2 3 HERAUFHOLEN DES UNTERFADENS PICKING UP BOBBIN THREAD , . , 15 . . , . , . 1. 2. 3. Ziehen Sie leicht am Oberfaden, und der Unterfaden kommt durch die Öffnung in der Stichplatte hera...
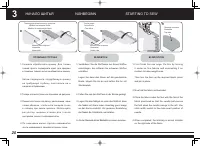
Seite 13 - SECURING SEAMS; GERADSTICH
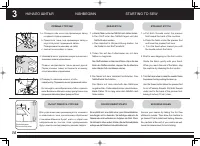
NÄHBEGINN STARTING TO SEW 11 3 14 SECURING SEAMS DIE RÜCKWÄRTSTASTE Secure your seams by taking the first few stitches in reverse. Then allow the machine to go forward. This is called back tacking. Reverse the machine at the end of your seams as well. Lower the reverse lever for back tacking. Es e...
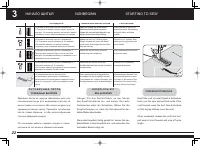
Seite 14 - Ausgewogen
NÄHBEGINN STARTING TO SEW 11 3 15 EINSTELLEN DER FADENSPANNUNG REGULIERUNG DER K APSELSPANNUNG A D J U S T I N G S T R A I G H T S T I T C H THREAD TENSION A D J U S T I N G B O B B I N T H R E A D TENSION . , . Eine gut aussehende Naht hängt we ...
Seite 15 - NEEDLE , THRE AD AND
NÄHBEGINN STARTING TO SEW 11 3 16 NEEDLE , THRE AD AND FABRIC CHART DIE NADEL-UND GARNTABELLE , . . Benut zen Sie Standardnadeln. Die Stär ke der Nadel sollte zur Stärke des Garns und beides zur Stoffar t passen. Use the standard needles. The size of your needle should match the ...
Seite 16 - NADEL AUSWECHSELN
NÄHBEGINN STARTING TO SEW 11 3 17 Flache Seite Flat side Nadel Needle Stift Pin Nadelklemmschraube Needle clamp screw NADEL AUSWECHSELN CHANGING THE NEEDLE , . , . . . . , . 1. 2. 3. 4. 5. 6. N a d e l k l e m m s c h r a u b e m i t d e m m ...
Seite 17 - ZICKZACKSTICH
NÄHBEGINN STARTING TO SEW 11 3 18 ZICKZACKSTICH ZIGZAG STITCHING , , . J e n a c h F a d e n , S t o f f , S t i c h u n d Nähgesc hwindigkeit kann der O ber faden eventuel l auf der Unterseite zu sehen sein. Der Unterfaden darf aber nie auf der Oberseite erschein...
Seite 18 - ELASTIKSTICH
NÄHBEGINN STARTING TO SEW 11 3 19 ELASTIKSTICH MULTI-STITCH ZIGZAG , , , . . , , , . . Der Elastikstich ist besonders strapazier fähig, weil er, anders als der normale Zickzackstich, auf gleichem Raum mehrere kurze Stiche näht. Er emp fi ehlt sich...
Seite 19 - BLINDSTICH
NÄHBEGINN STARTING TO SEW 11 3 20 BLINDSTICH BLIND STITCH . , , . . . . , . , . 1. 2. 3. 4. Versäubern Sie die Stoffkante: bei feinen Stoffen umschlagen, bei mittleren bis schweren Stoffen umnähen. Legen Sie dann den S...
Seite 20 - A U S W E C H S E L N
NÄHBEGINN STARTING TO SEW 11 3 21 A U S W E C H S E L N DES NÄHFUSSES NÄHEN VON KNOPFLÖCHERN BUTTONHOLE MAKING CHANGING PRESSER FEET . . . , . 0,5 . Z e i c h n e n S i e d i e L ä n g e d e s K n o p f l o c h e s s o r g f ä l t i g a u t I h r e Nähar...
Seite 21 - K N O P F L O C H M I T; CORDED BUTTONHOLES
NÄHBEGINN STARTING TO SEW 11 3 22 ( ) . , . , . K N O P F L O C H M I T BEILAUFFADEN H ä n g e n S i e d e n B e i l a u f f a d e n a n d e r N o c k e d e s K n o p f l o c h s c h u h s e i n, u n d z i e h e n S i e b e i d...