Jaguar 271 - Anleitungen
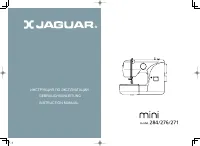
Bedienungsanleitung Jaguar 271


Zusammenfassung
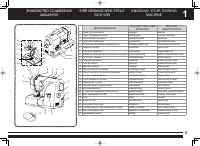
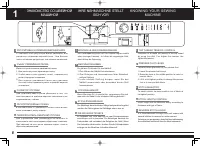
11 1 IHRE NÄHMASCHINE STELLT SICH VOR KNOWING YOUR SEWING MACHINE 5 DIE HAUPTTEILE DER MASCHINE MACHINE IDENTIFICATION 1 Tragegriff Handle 2 Nähfußhebel Presser foot lever 3 Garnrollenhalter Spool pin 4 Typenschild Identi fi cation plate 5 Oberfadenspannung Thread tension control 6 Kopfdec...
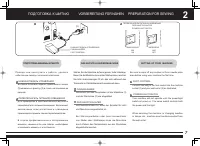
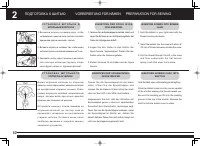
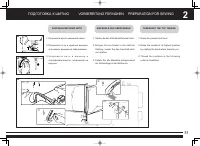
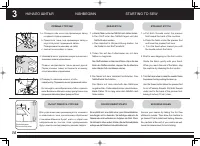
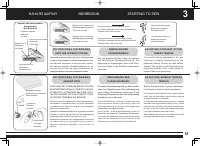
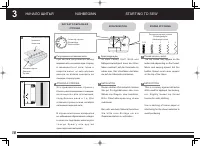
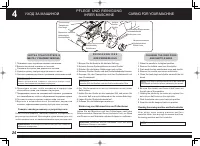
11 2 VORBEREITUNG FÜR NÄHEN PREPARATION FOR SEWING 7 DAS AUFSTELLEN DER MASCHINE SETTING UP YOUR 摹 MACHINE , . Stel len Sie die Maschine auf eine gerade, feste Unterlage. Bevor Sie die Maschine zum ersten Mal benutzen, wischen Sie bitte überschüssiges Öl ab, das sich während des Transports im Stichp...
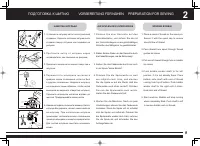
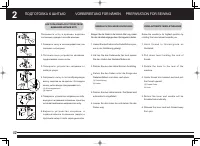
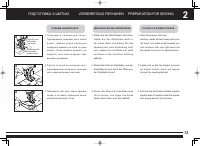
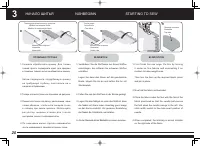
11 2 VORBEREITUNG FÜR NÄHEN PREPARATION FOR SEWING 8 1 2 3 H E R A U S N E H M E N D E R SPULENK APSEL REMOVING BOBBIN CASE FROM SHUTTLE , . , . , . , , . , , . 1. 2. 3. Entfernen Sie den Anschiebetisch von der Masc hine. Br ingen Sie die Nadel in ihre höchste Stellung, indem Sie das Handrad...
Other Jaguar Nähmaschinen Manuals
-
 Jaguar 121
Bedienungsanleitung
Jaguar 121
Bedienungsanleitung
-
 Jaguar 139
Bedienungsanleitung
Jaguar 139
Bedienungsanleitung
-
 Jaguar 141
Bedienungsanleitung
Jaguar 141
Bedienungsanleitung
-
 Jaguar 255
Bedienungsanleitung
Jaguar 255
Bedienungsanleitung
-
 Jaguar 277
Bedienungsanleitung
Jaguar 277
Bedienungsanleitung
-
 Jaguar 288
Bedienungsanleitung
Jaguar 288
Bedienungsanleitung
-
 Jaguar 780
Bedienungsanleitung
Jaguar 780
Bedienungsanleitung
-
 Jaguar 781
Bedienungsanleitung
Jaguar 781
Bedienungsanleitung
-
 Jaguar 782
Bedienungsanleitung
Jaguar 782
Bedienungsanleitung
-
 Jaguar 786
Bedienungsanleitung
Jaguar 786
Bedienungsanleitung
-
 Jaguar 787
Bedienungsanleitung
Jaguar 787
Bedienungsanleitung
-
 Jaguar 788
Bedienungsanleitung
Jaguar 788
Bedienungsanleitung
-
 Jaguar 789
Bedienungsanleitung
Jaguar 789
Bedienungsanleitung
-
 Jaguar 961
Bedienungsanleitung
Jaguar 961
Bedienungsanleitung
-
 Jaguar 962
Bedienungsanleitung
Jaguar 962
Bedienungsanleitung
-
 Jaguar 966
Bedienungsanleitung
Jaguar 966
Bedienungsanleitung
-
 Jaguar 967
Bedienungsanleitung
Jaguar 967
Bedienungsanleitung
-
 Jaguar 212 Mini
Bedienungsanleitung
Jaguar 212 Mini
Bedienungsanleitung
-
 Jaguar 236 Mini
Bedienungsanleitung
Jaguar 236 Mini
Bedienungsanleitung
-
 Jaguar 242 Mini
Bedienungsanleitung
Jaguar 242 Mini
Bedienungsanleitung