sostituzione della cartuccia; e che le guarnizioni siano correttamente posizionate.; cartridge rePlacement; the body of the mixer.; suBstitution de la cartouche; en su asiento (X) y que las juntas estén posicionadas correctamente. - Gessi 37064W - Bedienungsanleitung - Seite 13


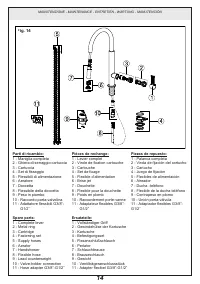


Inhalt:
- Seite 3 – Prima dell’installazione e messa in Funzione; DATI TECNICI; BeFore installation and setting to work; TECHNICAL DATA; avant l’installation et la mise en Fonction; DONNÉES TECHNIQUES; vor der installation und inBetrieBnahme; TECHNISCHE DATEN
- Seite 4 – OK
- Seite 9 – Dann schließt man die Schläuche an das Versorgungsnetz an.; instalación; de fijación es posible no utilizar la brida triangular de plástico.
- Seite 13 – sostituzione della cartuccia; e che le guarnizioni siano correttamente posizionate.; cartridge rePlacement; the body of the mixer.; suBstitution de la cartouche; en su asiento (X) y que las juntas estén posicionadas correctamente.
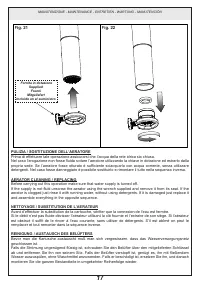
- Seite 14 – and assemble everything in the opposite sequence.; nettoyage / suBstitution de l’aerateur; remplacer et tout remonter dans la séquence inverse.; reinigung / austausch des BelÜFters; Fornita in dotazione
16
MANUTENZIONE - MAINTENANCE - ENTRETIEN - WARTUNG - MANUTENCIÓN
sostituzione della cartuccia
Prima di sostituire la cartuccia, accertarsi che il raccordo dell’acqua sia chiuso.
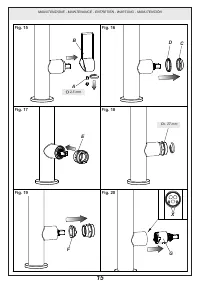
Togliere il tappino in finitura facendo attenzione a non danneggiarlo e svitare il grano (A) per poter
estrarre la maniglia (B). Sollevare la ghiera copricartuccia (C) facendo leva tramite l’apposita scanalatura
di riferimento. Allontanare l’anello indicatore (D) ed, utilizzando la chiave (E) in dotazione, svitare la
ghiera di fissaggio (F) e togliere la cartuccia danneggiata (G) dal corpo del miscelatore.
Infine introdurre la nuova cartuccia, accertandosi che le due spine di centraggio siano nella loro sede (X)
e che le guarnizioni siano correttamente posizionate.
cartridge rePlacement
Before carrying out this operation make sure that water supply is turned off.
Remove the finish plug paying attention not to damage it and unscrew the screw (A) to extract the handle
(B).Lift the finishing ring nut (C) using the reference notch. Take away the indicator ring (D) and, using
the wrench (E) supplied, unscrew the fastening ring nut (F) and remove the damaged cartridge (G) from
the body of the mixer.
Put the new cartridge into the body checking that the two centering pins enters into the respective seats
(X) and that gaskets are well positioned.
suBstitution de la cartouche
Avant d’effectuer la substitution de la cartouche, vérifier que la connexion de l’eau est fermée.
Enlever le bouchon en finition faisant attention à ne pas l’abîmer et dévisser les grains de fixage (A)
pour pouvoir extraire la poignée (B). Soulever la virole de finition (C) en utilisant la rainure de référence.
Eloigner la bague indicatrice (D) et, utilisant la clé (E) fournie, dévisser la virole de fixation (F) et enlever
la cartouche abîmée (G) du corps du mitigeur.
Introduire enfin la cartouche nouvelle, en vérifiant que les deux pivots de centrage entrent dans les sièges
respectifs (X) et que les garnitures sont bien positionnées.
austauschen der kartusche
Bevor man die Kartusche austauscht muß man sich vergewissern, dass das Wasserversorgungsnetz
geschlossen ist.
Den Endverschluss herausnehmen, ohne ihn zu beschädigen, und den Bolzen (A) abschrauben, um den
Handgriff herausnehmen zu können (B). Die Nutmutter, welche die Kartusche (C) abdeckt, entfernen,
wobei man Druck auf die eigens dafür vorgesehene Bezugsrille ausübt. Den Zeigering (D) entfernen und
den Befestigungsring (F) über den mitgelieferten Schlüssel (E) abschrauben. Die beschädigte Kartusche
(G) vom Mischerkörper entfernen.
Schließlich eine neue Kartusche einsetzen, wobei man sich vergewissert, dass sich die beiden
Zentrierstifte in ihrem Sitz befinden (X) und das die Dichtungen korrekt positioniert sind.
sustitución del cartucho
Antes de sustituir el cartucho, asegúrense que la conexión del agua esté cerrada.
Quiten el taponcito de acabado cuidando con no dañarlo y destornillen la clavija de fijación (A) para
extraer la maneta (B). Levanten la virola cubre-cartucho (C) utilizando la ranura de referencia. Alejen el
anillo indicador (D) y, utilizando la llave (E) incluida en el suministro, destornillen la virola de fijación (F)
y remuevan el cartucho dañado (G) del cuerpo del mezclador.
Finalmente introduzcan el cartucho nuevo, asegurándose que las dos clavijas de centraje se encuentren
en su asiento (X) y que las juntas estén posicionadas correctamente.
„Anleitung wird geladen“ bedeutet, dass Sie warten müssen, bis die Datei vollständig geladen ist und Sie sie online lesen können. Einige Anleitungen sind sehr groß, und die Zeit, bis sie angezeigt wird, hängt von Ihrer Internetgeschwindigkeit ab.
Zusammenfassung
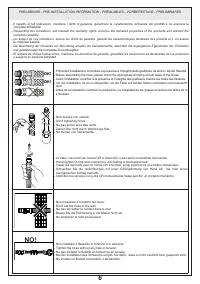
4 PRELIMINARI - PRE-INSTALLATION INFORMATION - PRÉALABLES - VORBEREITUNG - PRELIMINARES Prima dell’installazione e messa in Funzione attenzione! I tubi d’alimentazione devono essere sciacquati con cura prima dell’installazione del mi- scelatore, in modo che non rimangano trucioli, residui di saldat...
6 PRELIMINARI - PRE-INSTALLATION INFORMATION - PRÉALABLES - VORBEREITUNG - PRELIMINARES - Prima dell’installazione controllare la presenza e l’integrità delle graffature da ambo i lati dei flessibili. - Before assembling the hose, please check the appropriate crimping of both sides of the hoses. - A...
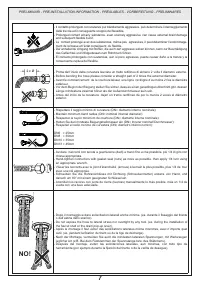
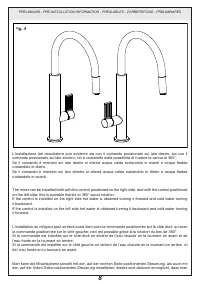
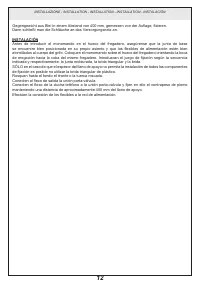
12 INSTALLAZIONE - INSTALLATION - INSTALLATION - INSTALLATION - INSTALACIÓN Gegengewicht aus Blei in einem Abstand von 400 mm, gemessen von der Auflage, fixieren. Dann schließt man die Schläuche an das Versorgungsnetz an. instalación Antes de introducir el monomando en el hueco del fregadero, asegúre...
Weitere Modelle Mischbatterien Gessi
-
 Gessi 13193
-
 Gessi 20573
-
 Gessi 20577
-
 Gessi 13193BN
-
 Gessi 20577B
-
 Gessi 20577BN