MSI MAG Z690 - Bedienungsanleitung - Seite 136
 2
2
 3
3
 4
4
 5
5
 6
6
 7
7
 8
8
 9
9
 10
10
 11
11
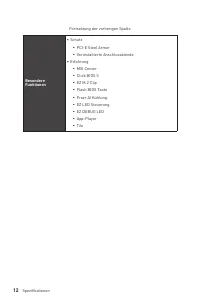
 12
12
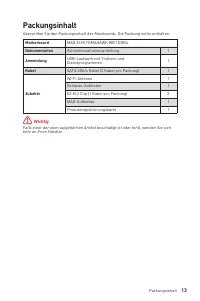
 13
13
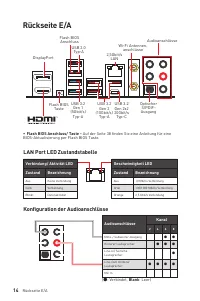
 14
14
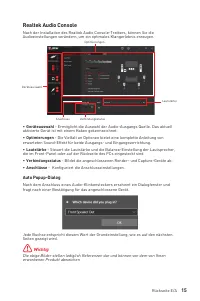
 15
15
 16
16
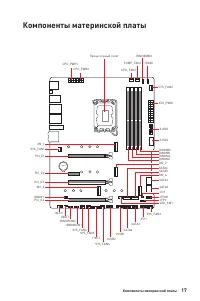
 17
17
 18
18
 19
19
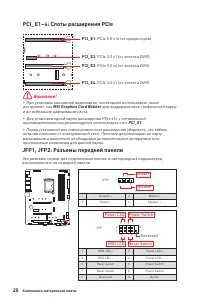
 20
20
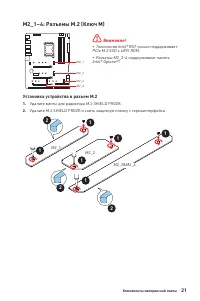
 21
21
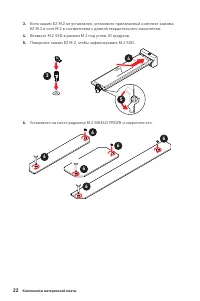
 22
22
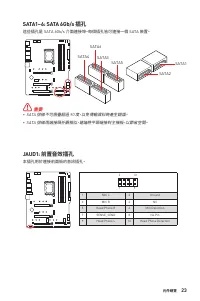
 23
23
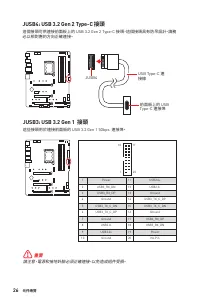
 24
24
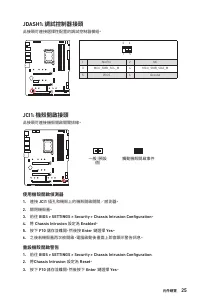
 25
25
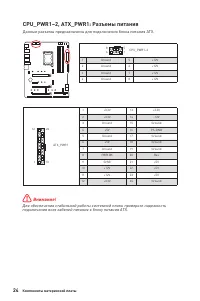
 26
26
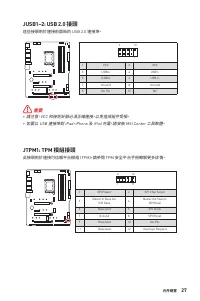
 27
27
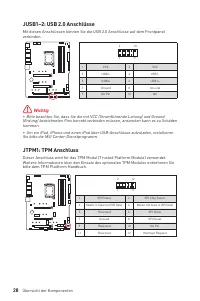
 28
28
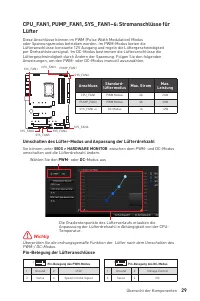
 29
29
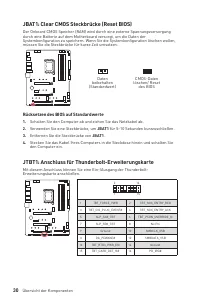
 30
30
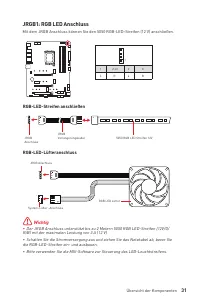
 31
31
 32
32
 33
33
 34
34
 35
35
 36
36
 37
37
 38
38
 39
39
 40
40
 41
41
 42
42
 43
43
 44
44
 45
45
 46
46
 47
47
 48
48
 49
49
 50
50
 51
51
 52
52
 53
53
 54
54
 55
55
 56
56
 57
57
 58
58
 59
59
 60
60
 61
61
 62
62
 63
63
 64
64
 65
65
 66
66
 67
67
 68
68
 69
69
 70
70
 71
71
 72
72
 73
73
 74
74
 75
75
 76
76
 77
77
 78
78
 79
79
 80
80
 81
81
 82
82
 83
83
 84
84
 85
85
 86
86
 87
87
 88
88
 89
89
 90
90
 91
91
 92
92
 93
93
 94
94
 95
95
 96
96
 97
97
 98
98
 99
99
 100
100
 101
101
 102
102
 103
103
 104
104
 105
105
 106
106
 107
107
 108
108
 109
109
 110
110
 111
111
 112
112
 113
113
 114
114
 115
115
 116
116
 117
117
 118
118
 119
119
 120
120
 121
121
 122
122
 123
123
 124
124
 125
125
 126
126
 127
127
 128
128
 129
129
 130
130
 131
131
 132
132
 133
133
 134
134
 135
135
 136
136
 137
137
 138
138
 139
139
 140
140
 141
141
 142
142
 143
143
 144
144
 145
145
 146
146
 147
147
 148
148
 149
149
 150
150
 151
151
 152
152
 153
153
 154
154
 155
155
 156
156
 157
157
 158
158
 159
159
 160
160
 161
161
 162
162
 163
163
 164
164
 165
165
 166
166
 167
167
 168
168

Inhalt:
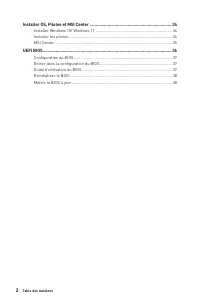
- Seite 14 – Inhalt; Sicherheitshinweis
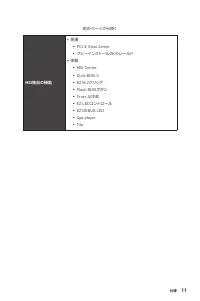
- Seite 15 – Installation von OS, Treibern & MSI Center
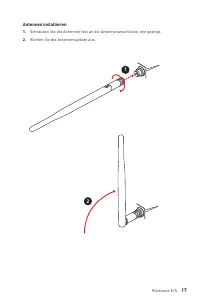
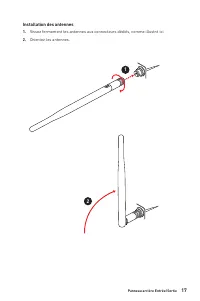
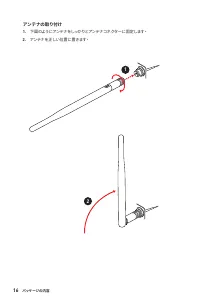
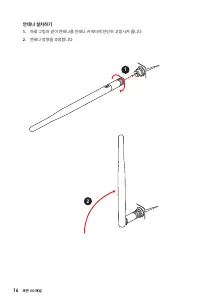
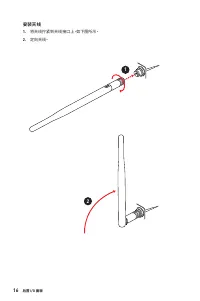
- Seite 17 – Hinweise zum Gehäuseabstandshalter
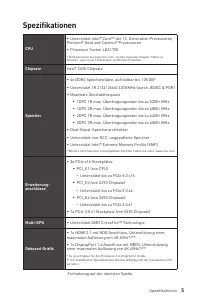
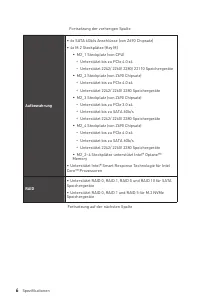
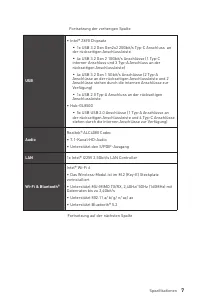
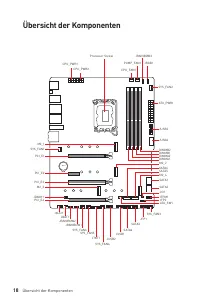
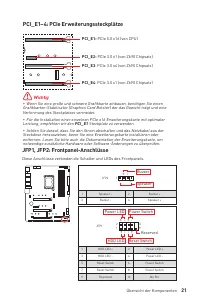
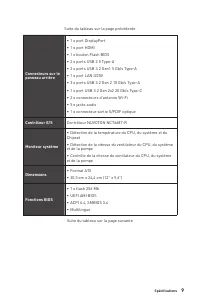
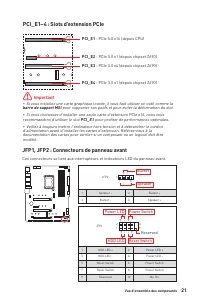
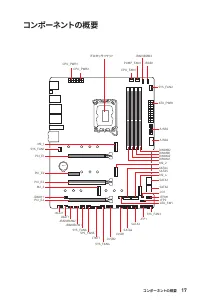
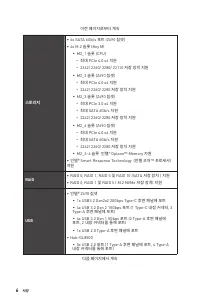
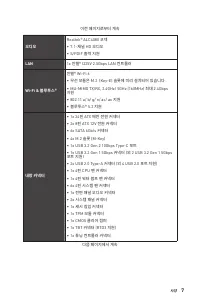
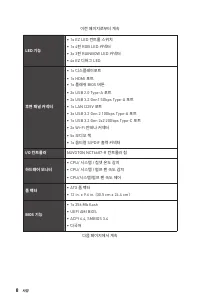
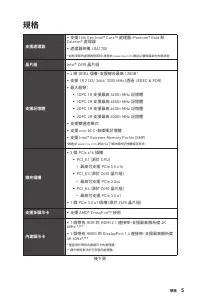
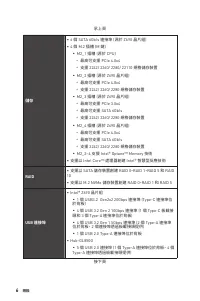
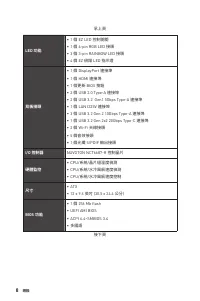
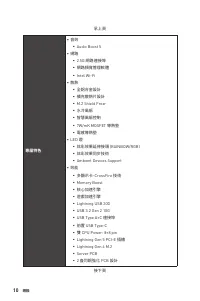
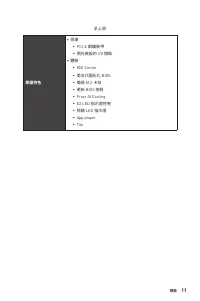
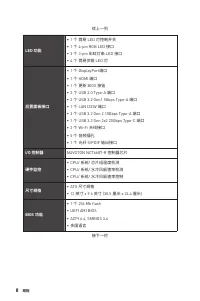
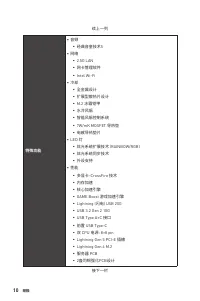
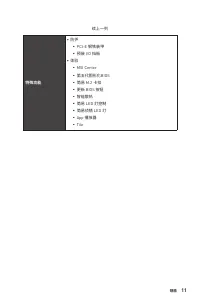
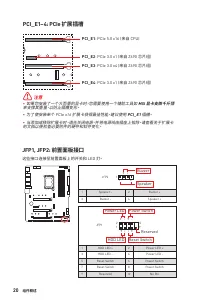
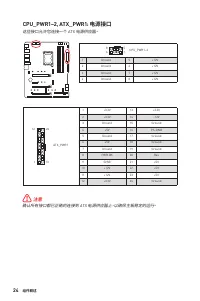
- Seite 18 – Spezifikationen; Chipsatz; anschlüsse
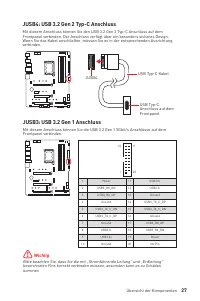
- Seite 20 – USB
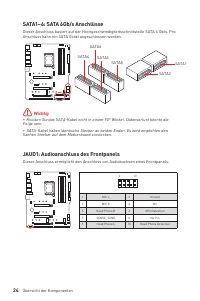
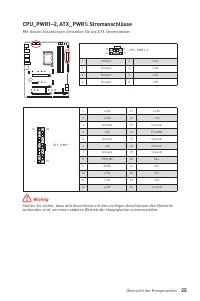
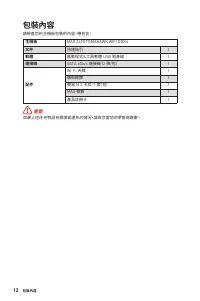
- Seite 26 – Packungsinhalt; Kabel; Wichtig
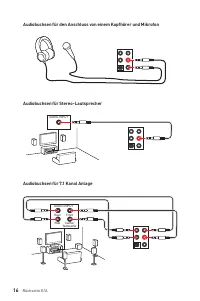
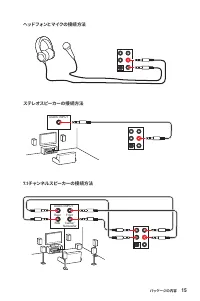
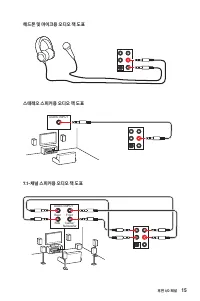
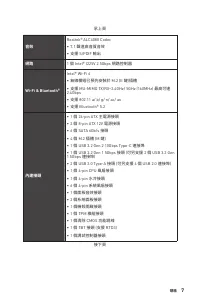
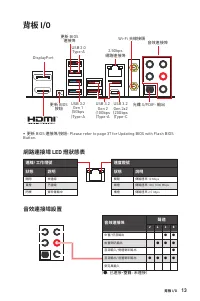
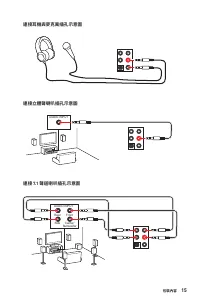
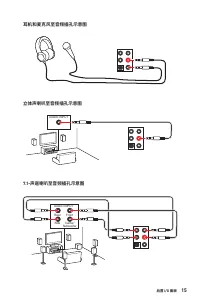
- Seite 27 – Konfiguration der Audioanschlüsse; Audioanschlüsse; LAN Port LED Zustandstabelle; Verbindung/ Aktivität LED
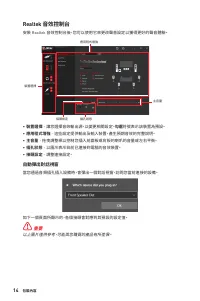
- Seite 28 – ∙ Geräteauswahl; Optimierungen; ∙ Lautstärke
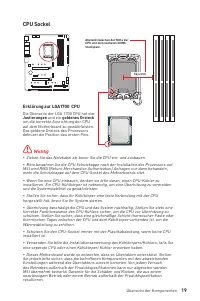
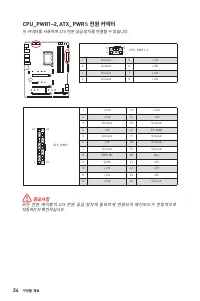
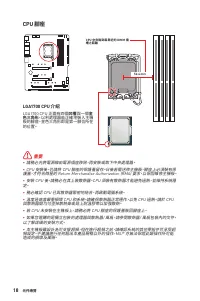
- Seite 32 – CPU Sockel; Justierungen
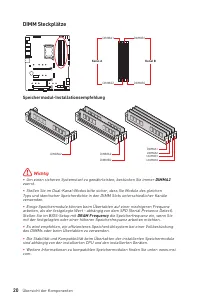
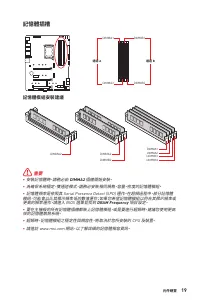
- Seite 33 – DIMM Steckplätze; Speichermodul-Installationsempfehlung
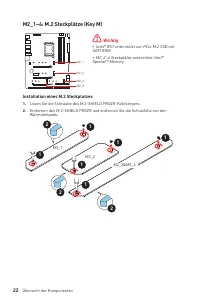
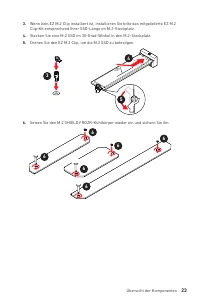
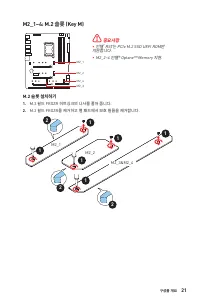
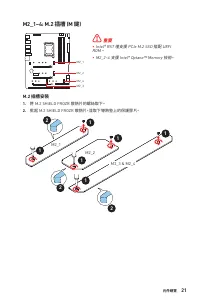
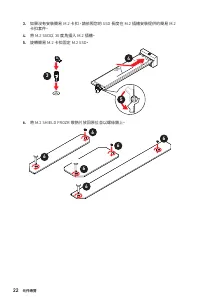
- Seite 35 – Installation eines M.2 Steckplatzes
- Seite 37 – JAUD1: Audioanschluss des Frontpanels
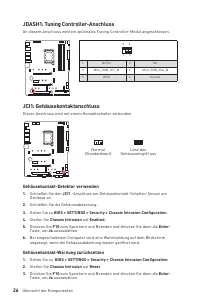
- Seite 39 – JCI1: Gehäusekontaktanschluss; Gehäusekontakt-Detektor verwenden; Gehäusekontakt-Warnung zurücksetzen
- Seite 42 – Lüfter; Umschalten des Lüfter-Modus und Anpassung der Lüfterdrehzahl; BIOS > HARDWARE MONITOR; Pin-Belegung der Lüfteranschlüsse; Anschluss
- Seite 43 – Rücksetzen des BIOS auf Standardwerte
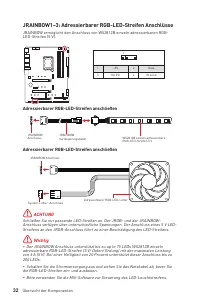
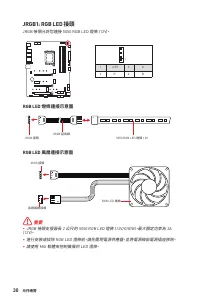
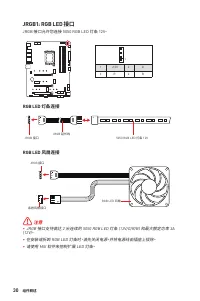
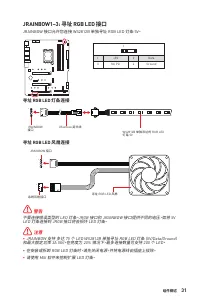
- Seite 44 – JRGB1: RGB LED Anschluss
- Seite 45 – ACHTUNG
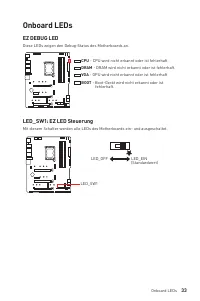
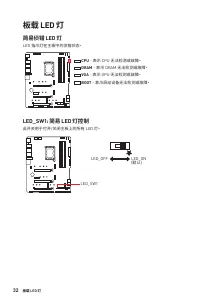
- Seite 46 – EZ DEBUG LED
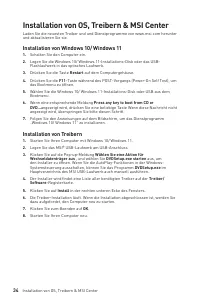
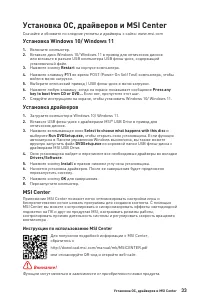
- Seite 47 – Installation von Windows 10/ Windows 11; Installation von Treibern; Wählen Sie eine Aktion für
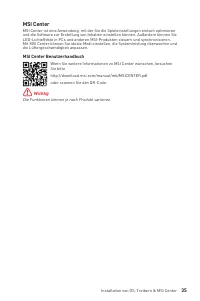
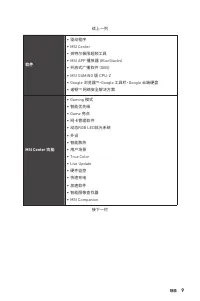
- Seite 48 – MSI Center Benutzerhandbuch
- Seite 49 – Ältere Grafikkarten; „Auf dieser Grafikkarte wurde; ENTF
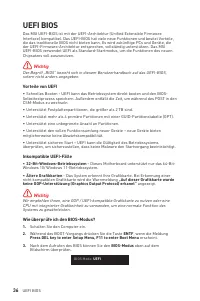
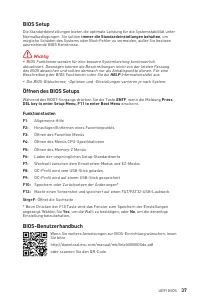
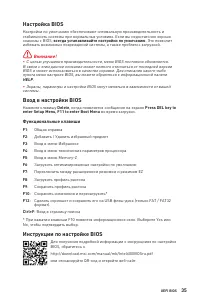
- Seite 50 – immer die Standardeinstellungen behalten; Öffnen des BIOS Setups; Funktionstasten; Yes
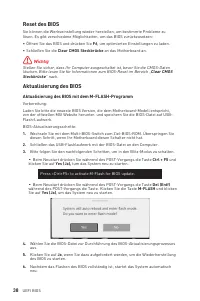
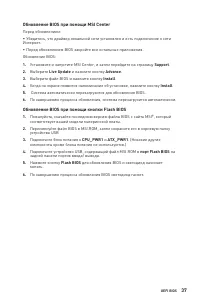
- Seite 51 – Reset des BIOS; Clear CMOS Steckbrücke; Aktualisierung des BIOS; Aktualisierung des BIOS mit dem M-FLASH-Programm
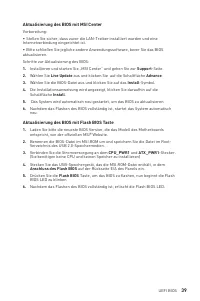
- Seite 52 – Aktualisierung des BIOS mit MSI Center; Install; Aktualisierung des BIOS mit Flash BIOS Taste; Anschluss des Flash BIOS
36
UEFI BIOS
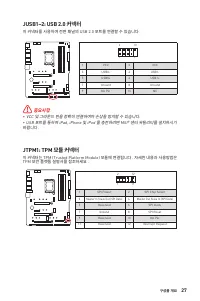
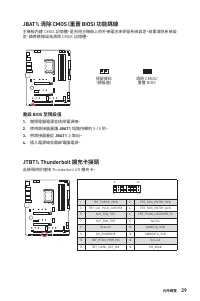
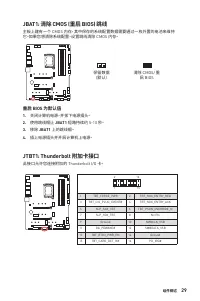
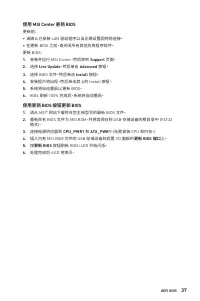
重設 BIOS
某些情況下,您可能會需要將 BIOS 復原為出廠預設值,以解決部份特定問題。有多種方法
可重設 BIOS:
∙
前往 BIOS,然後按
F6
載入最佳化預設值。
∙
將主機板上的
清除 CMOS
功能跳線短路。
⚠
重要
在清除 CMOS 數據之前,請確保計算機已關閉。請參閱
清除 CMOS
跳線部分以重置
BIOS。
更新 BIOS
以 M-FLASH 更新 BIOS
更新前:
請從 MSI 網站下載符合您主機板型號的最新 BIOS 檔案。然後將 BIOS 檔案存到 USB 隨
身碟。
更新 BIOS:
1.
透過多重 BIOS 切換開關以切換到目標 BIOS ROM。如果您的主機板沒有此開關,請
跳過此步驟。
2.
將內含更新檔的 USB 隨身碟插入 USB 連接埠。
3.
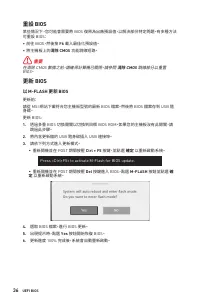
請依下列方式進入更新模式。
▪
重新開機並在 POST 期間按壓
Ctrl + F5
按鍵,並點選
確定
以重新啟動系統。
Press <Ctrl+F5> to activate M-Flash for BIOS update.
▪
重新開機並在 POST 期間按壓
Del
按鍵進入 BIOS,點選
M-FLASH
按鈕並點選
確
定
以重新啟動系統。
4.
選取 BIOS 檔案,進行 BIOS 更新。
5.
出現提示時,點選
Yes
按鈕開始恢復 BIOS。
6.
更新進度 100% 完成後,系統會自動重新啟動。
„Anleitung wird geladen“ bedeutet, dass Sie warten müssen, bis die Datei vollständig geladen ist und Sie sie online lesen können. Einige Anleitungen sind sehr groß, und die Zeit, bis sie angezeigt wird, hängt von Ihrer Internetgeschwindigkeit ab.
Zusammenfassung
1 Inhalt Inhalt Sicherheitshinweis ................................................................................................ 3 Hinweise zum Gehäuseabstandshalter ................................................................. 4Hinweis zur Schadensvermeidung ....................................
2 Inhalt Installation von OS, Treibern & MSI Center ........................................................ 34 Installation von Windows 10/ Windows 11 ........................................................... 34Installation von Treibern ...........................................................
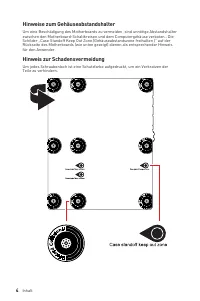
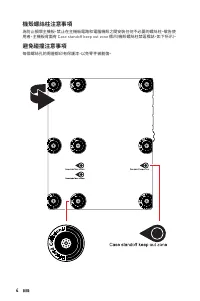
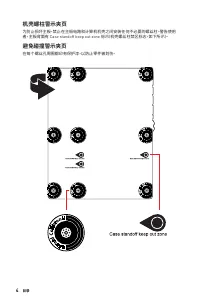
4 Inhalt Hinweise zum Gehäuseabstandshalter Um eine Beschädigung des Motherboards zu vermeiden, sind unnötige Abstandshalter zwischen den Motherboard-Schaltkreisen und dem Computergehäuse verboten. . Die Schilder „Case Standoff Keep Out Zone (Gehäuseabstandszone freihalten )“ auf der Rückseite des M...
Weitere Modelle Hauptplatinen MSI
-
 MSI A320M-A PRO
-
 MSI A520
-
 MSI A520M-A PRO
-
 MSI B450M-A PRO
-
 MSI B550-A PRO
-
 MSI B550M PRO-VDH
-
 MSI B560
-
 MSI B560-A PRO
-
 MSI B560M BOMBER
-
 MSI B560M PRO-E