English; Before starting; Deutsch; Vorbereitungen - Electrolux XXLBOX14 - Bedienungsanleitung - Seite 8

Staubsauger Electrolux XXLBOX14 – Bedienungsanleitung, kostenlos online im PDF-Format lesen. Wir hoffen, dass dies Ihnen hilft, etwaige Fragen zu klären. Wenn Sie noch Fragen haben, kontaktieren Sie uns bitte über das Kontaktformular.
2
 3
3
 4
4
 5
5
 6
6
 7
7
 8
8
 9
9
 10
10
 11
11
 12
12
 13
13
 14
14
 15
15
 16
16
 17
17
 18
18
 19
19
 20
20
 21
21
 22
22
 23
23
 24
24
 25
25
 26
26
 27
27
 28
28
 29
29
 30
30
 31
31
 32
32
 33
33
 34
34
 35
35
 36
36
 37
37
 38
38
 39
39
 40
40
 41
41
 42
42
 43
43
 44
44
 45
45
 46
46
 47
47
 48
48
 49
49
 50
50
 51
51
 52
52
 53
53
 54
54
 55
55
 56
56
 57
57
 58
58
 59
59
 60
60
 61
61
 62
62
 63
63
 64
64
 65
65
 66
66
 67
67
 68
68
 69
69
 70
70
 71
71
 72
72
 73
73
 74
74
 75
75
 76
76
 77
77
 78
78
 79
79
 80
80
 81
81
 82
82
 83
83
 84
84
 85
85
 86
86
 87
87
 88
88
 89
89
 90
90
 91
91
 92
92
 93
93
 94
94
 95
95
 96
96
 97
97
 98
98
 99
99
 100
100
 101
101
 102
102
 103
103
Inhalt:
- Seite 8 – English; Before starting; Deutsch; Vorbereitungen
- Seite 10 – Getting the best results.; Bestmögliche Reinigungsergebnisse
- Seite 16 – feature; Replacing the ErgoboxTM with the dust bag.; verwenden; Die ErgoboxTM durch Staubbeutel ersetzen.
- Seite 18 – Replacement of the exhaust filter*; Filterwechsel
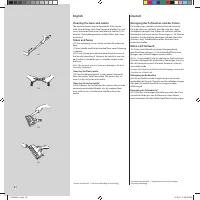
- Seite 20 – Cleaning the hose and nozzle; Cleaning the floor nozzle; Reinigung des Schlauches und der Düsen; Reinigung der Bodendüse
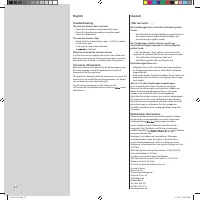
- Seite 22 – Troubleshooting; „Was tun wenn ... „
8
* Certain models only. ** Execution depending on technology
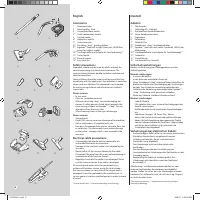
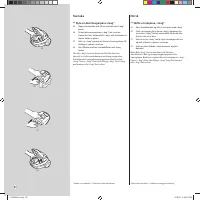
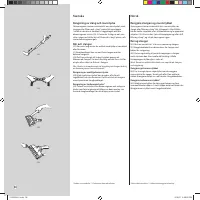
English
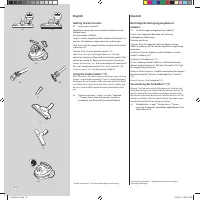
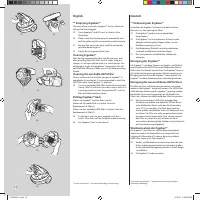
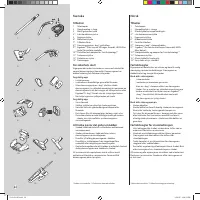
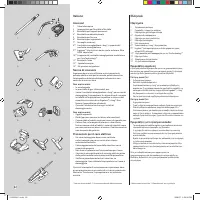
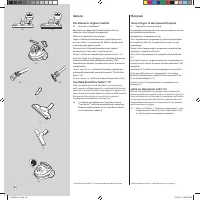
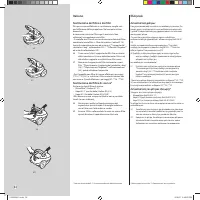
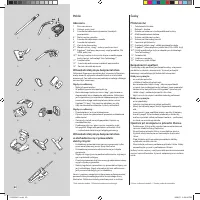
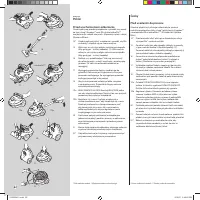
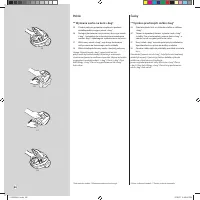
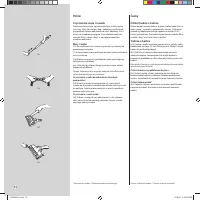
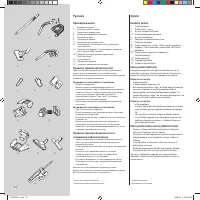
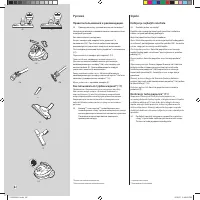
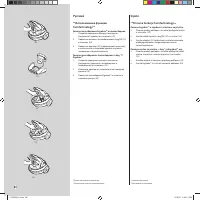
Before starting
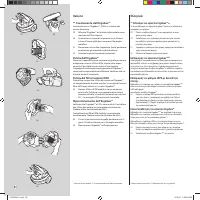
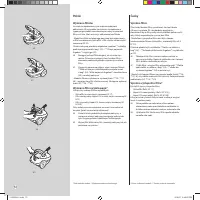
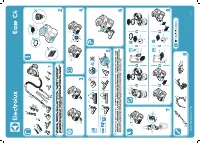
Open the front cover on the machine and check that the
dust bag, s-bag® / Ergobox™ , and the motor-/microfilter**
are in place. (See also Replacement of filter(s))
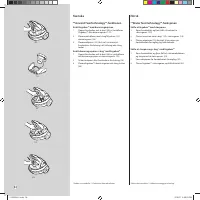
14* Open the back lid* on the machine and check that
the exhaust filter* is in place.
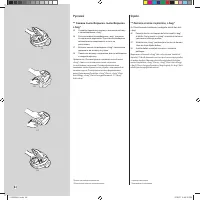
15 Insert the hose until the catches click to engage
(press the catches to release the hose). (2). Insert the
hose into the hose handle until the catches click to
engage (press the catches to release the hose).
16 Attach the or telescopic tube* to the hose handle
and nozzle by pushing and twisting together. (Twist
and pull apart to dismantle.)
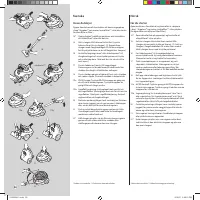
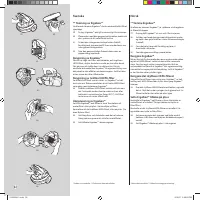
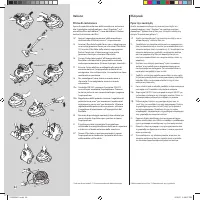
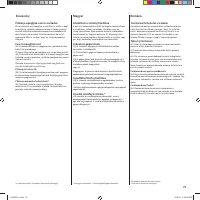
17 Extend the electric cable and connect it to the mains.
The vacuum cleaner is fitted with a cable winder.
Once the electric cable has been extended, it stays in
that position.
18 To rewind the cable, give it a slight sharp pull and
then release. The cable will then automatically
rewind.
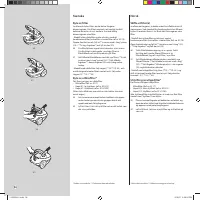
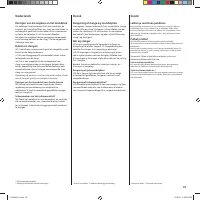
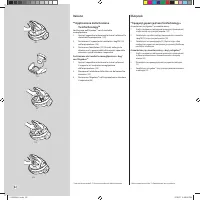
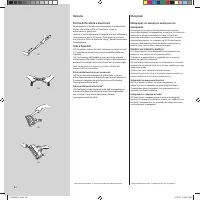
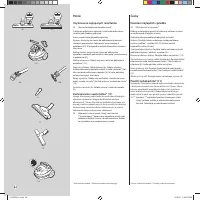
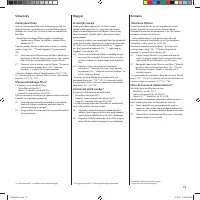
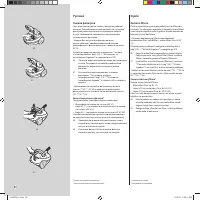
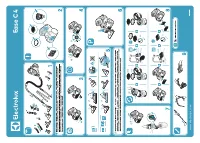
19a ON/OFF control: Push the ON-OFF button once to
start the vacuum cleaner. Push same button once
more to turn it off.
19b Power Regulation: Twist the power control towards
„max” to increase the suction power. Twist the power
control towards „min” to decrease suction power.
Additional suction power control: Use the suction
control on the hose handle.
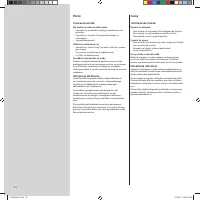
20 Practical parking positions (and at the same time a
backsaving feature) when you pause during cleaning
or when you carry and store the vacuum cleaner.
21 You can also carry the vacuum cleaner using the
handle on top or on the lower front edge of the
machine.
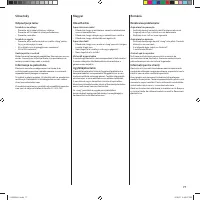
22* Keep the hose in place while storing the vacuum
cleaner by extending the elastic bumper cord and
placing it across the hose
cordmatic™
14.
15.
16.
17.
18.
19a.
19b.
21.
22.
20.
Deutsch
Vorbereitungen
Vordere Abdeckung des Geräts öffnen und kontrollieren,
ob ein Staubbeutel, s-bag® / Ergobox™ und Motorfilter**
eingesetzt sind (siehe auch „Filterwechsel“.)
14
Die hintere Abdeckung* des Geräts öffnen und
kontrollieren, ob der Abluftfilter* eingesetzt ist.
15
Den Schlauch einsetzen, bis die Verriegelung
einrastet. Zur Freigabe des Schlauches die
Verriegelung drücken.
16
Das Teleskoprohr* durch Drehen und festes
Zusammenschieben an Schlauchgriff und Bodendüse
anbringen. (Zum Zerlegen drehen und auseinander
ziehen.)
17
Das Kabel herausziehen und den Stecker in die
Steckdose stecken. Der Staubsauger verfügt
über eine automatische Kabelaufwicklung.
Nach dem Herausziehen des Kabels arretiert die
Kabelaufwicklung.
18
Zum Aufwickeln des Kabels kurz am Kabel ziehen
und dann loslassen. Das Kabel wird dann automatisch
aufgewickelt.
19a EIN/AUS-Regler: Zum Einschalten des Staubsaugers
den EIN/AUS-Schalter einmal drücken. Erneutes
Drücken schaltet das Gerät aus.
19b Leistungsregulierung: Zum Steigern der Saugleistung
Leistungsregler in Richtung „max“ drehen. Zum
Reduzieren der Saugleistung Leistungsregler in
Richtung „min“ drehen. Zusätzliche Regelung der
Saugleistung: Saugsteuerung am Schlauchgriff*
einstellen.
20
Praktische Parkposition für Arbeitspausen, den
Transport und die Aufbewahrung des Staubsaugers.
21
Der Staubsauger kann am Griff oder an der unteren
Vorderkante getragen werden.
22* Den Schlauch für die Aufbewahrung des Staubsaugers
fixieren. Dazu elastischen Gummizug herausziehen
und um den Schlauch ziehen.
* Nur bestimmte Modelle. ** Vorgehensweise von der jeweiligen
Technologie abhängig
2192924-01.indd 8
2/13/07 4:39:46 PM
„Anleitung wird geladen“ bedeutet, dass Sie warten müssen, bis die Datei vollständig geladen ist und Sie sie online lesen können. Einige Anleitungen sind sehr groß, und die Zeit, bis sie angezeigt wird, hängt von Ihrer Internetgeschwindigkeit ab.
Zusammenfassung
8 * Certain models only. ** Execution depending on technology English Before starting Open the front cover on the machine and check that the dust bag, s-bag® / Ergobox™ , and the motor-/microfilter** are in place. (See also Replacement of filter(s))14* Open the back lid* on the machine and check tha...
10 * Certain models only. ** Execution depending on technology English Getting the best results. 23 Accessories on board*Upholstery nozzle and crevice nozzle to be found under foldable cover. Use the nozzles as follows: Carpets: Use the carpet/hard floor nozzle with the lever* in position (40). Redu...
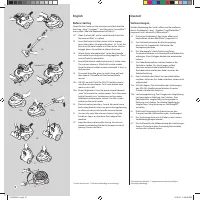
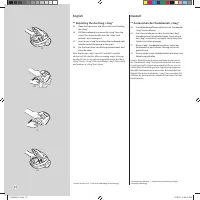
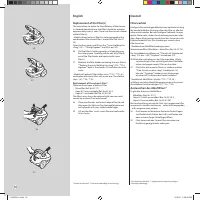
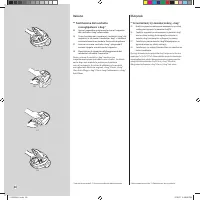
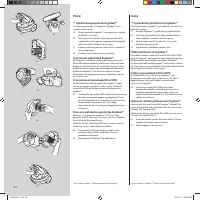
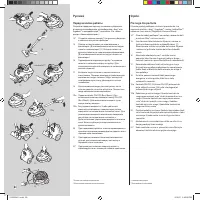
16 * Certain models only. ** Execution depending on technology English **Apply TwinTechnology TM feature Replacing the Ergobox™ with the dust bag. 1. Open the front cover and remove (lift out) the box from the cleaner. ( 29) 2. Place the insert holding the s-bag® (10) into the cleaner. (28) 3. Place...
Weitere Modelle Staubsauger Electrolux
-
 Electrolux EC41-2SW
-
 Electrolux EC41-4T
-
 Electrolux EC41-ANIM
-
 Electrolux EC41-H2SW
-
 Electrolux EER73DB
-
 Electrolux EER73IGM
-
 Electrolux PC91-8STM
-
 Electrolux PC91-ALRG
-
 Electrolux PD91-8SSM
-
 Electrolux UCORIGIN