Oregon Scientific RRA320PN-B - Bedienungsanleitung - Seite 9


LCD Clock with Projection &
Analogue FM Radio
Model: RRA320PN
USER MANUAL
OVERVIEW
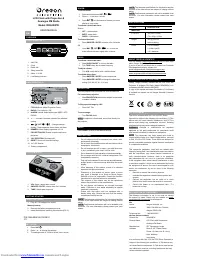
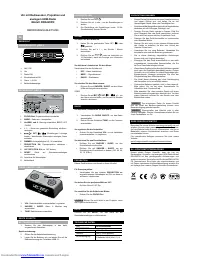
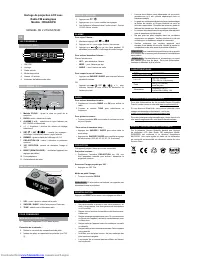
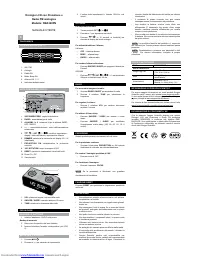
FRONT VIEW (FIG. 1)
1. AM / PM
2. Clock
3. Radio ON
4. Sleep mode ON
5. Alarm 1 / 2 ON
6. Low Battery indicator
BACK VIEW (FIG. 2)
1
2
1.
FOCUS
Wheel: Adjust Projection Focus
2.
RADIO
: Turn radio On / Off
3.
ALARM 1
and
2
: Select alarm type, BEEP / OFF /
RADIO
4.
+ / -
: Increase / decrease values of the selected
setting
5.
/ SET
/
, : Change settings /
display / View respective alarm status; set alarm
6.
DIMMER
: Select display brightness LO / HI
7.
PROJECTION ON
: Enable / disable continuous
projection
8.
180° ROTATION
: flip image180°
9.
RESET
: Reset unit to default settings
10.
AC / DC
Socket
11. Battery compartment
TOP VIEW (FIG. 3)
1. VOL: Mute / adjust radio volume
2.
SNOOZE / SLEEP
: silence alarm for 8 minutes
3. TUNE: Select radio frequency
GETTING STARTED
INSERT BATTERIES
1. Plug AC / DC adaptor into socket.
Memory backup:
2. Remove the battery compartment cover.
3. Insert the batteries, matching the polarities (FIG.2).
SET CLOCK
1. Press
.
2. Press + or - to change the settings.
3. The settings order is: 12/24 hr format, hour, minute.
ALARM
To set the alarm:
1. Press and hold desired SET
/
.
2. Press + / - to set hour / minute.
3. Press
(or 10 seconds of inaction) to return
display to clock mode.
To activate / deactivate alarm:
Slide to:
•
OFF
– disable alarm
•
BEEP
- beep alarm
•
RADIO
– Radio alarm
To silence the alarm:
•
Press
SNOOZE / SLEEP
to silence it for 8 minutes
OR
•
Press
,
SET
/
,
+ / -
to turn the
alarm off and activate it again after 24 hours.
RADIO
To activate / deactivate radio:
1. Slide
RADIO ON/OFF
to turn on the radio.
2. Turn
TUNE
rotary dial to select frequency.
To adjust volume:
•
Turn
VOL
rotary dial to mute / adjust volume.
To activate sleep timer:
•
Press
SNOOZE / SLEEP
to enter sleep mode.
•
Press
SNOOZE / SLEEP
to change the sleep time.
setting (120, 90, 60, 30, 15, 0 min).
PROJECTION
This unit projects time information for your convenience.
For continuous projection:
•
Slide
PROJECTION
switch when adaptor is
connected, to enable / disable.
To flip projected image by 180°:
•
Press 180° Flip.
To focus image:
•
Turn
FOCUS
wheel.
NOTE
If projection is illuminated, do not look directly into
the projector.
RESET
Press
RESET
to return to the default settings.
PRECAUTIONS
•
Do not subject the unit to excessive force, shock, dust,
temperature or humidity.
•
Do not cover the ventilation holes with any items such
as newspapers, curtains etc.
•
Do not immerse the unit in water. If you spill liquid over
it, dry it immediately with a soft, lint-free cloth.
•
Do not clean the unit with abrasive or corrosive materials.
•
Do not tamper with the unit’s internal components. This
invalidates the warranty.
•
Only use fresh batteries. Do not mix new and old
batteries.
•
Images shown in this manual may differ from the actual
display.
•
When disposing of this product, ensure it is collected
separately for special treatment
.
•
Placement of this product on certain types of wood
may result in damage to its finish for which Oregon
Scientific will not be responsible. Consult the furniture
manufacturer’s care instructions for information.
•
The contents of this manual may not be reproduced
without the permission of the manufacturer.
•
Do not dispose old batteries as unsorted municipal
waste. Collection of such waste separately for special
treatment is necessary.
•
Please note that some units are equipped with a
battery safety strip. Remove the strip from the battery
compartment before first use.
NOTE
The technical specifications for this product and the
contents of the user manual are subject to change without
notice.
SPECIFICATIONS
TYPE
DESCRIPTION
L x W x H
183 x 67 x 81mm
(72 x 26.4 x 31.9in)
Weight
386g (13.6oz)
without battery
Power
6V AC adaptor
2 x UM-4 (AAA)
1.5V batteries
ABOUT OREGON SCIENTIFIC
Visit our website (
www.oregonscientific.com
) to learn
more about Oregon Scientific products. If you’re in the US
and would like to contact our Customer Care department
directly, please visit:
www2.oregonscientific.com/service/support.asp
For international inquiries, please visit:
www2.oregonscientific.com/about/international
LCD時鐘附投射和類比
FM收音機
型號︰RRA320PN
用戶手冊
概要
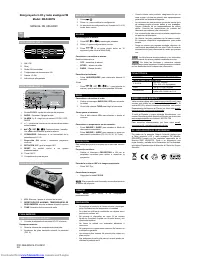
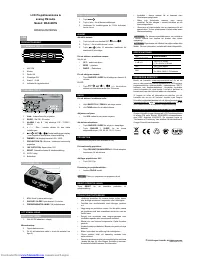
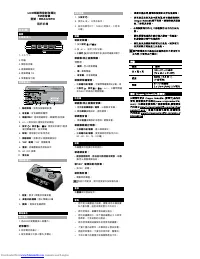
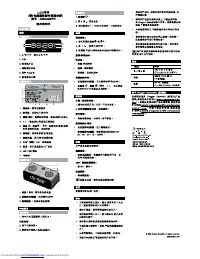
正面圖(圖1)
1. 上午/下午
2. 時鐘
3. 開啟收音機
4. 啟動睡眠模式
5. 啟動鬧鐘 1/2
6. 低電量指示器
背面圖(圖2)
1.
焦距轉盤︰
聚焦投影機的影像
2.
收音機︰
收音機開啟/關閉
3.
鬧鐘1和2︰
選取鬧鐘類型、嗶/關閉/收音機
4.
+ / - :
增加/減少選取設定的數值
5.
設定
/ 設定
、
︰
變更設定/顯示/檢視
個別鬧鐘狀態、設定鬧鐘
6.
較暗︰
選取顯示的低/高亮度
7.
開啟投射:
啟動/停止啟動連續投射
8.
180°旋轉︰
180°翻轉影像
9.
重設︰
將機體重設為預設設定
10. AC / DC 插槽
11.
電池格
頂部圖(圖3)
1.
音量︰
靜音 / 調整收音機音量
2.
貪睡功能/睡眠︰
靜止鬧鐘8分鐘
3.
調頻 ︰
選取收音機調頻
開始操作
插入電池
1. 將AC/DC變壓器插入插槽內。
記憶備份︰
2. 移除電池格蓋子。
3. 配合兩極方向插入電池(見圖2)。
設定時鐘
1. 按
設定
。
2. 使用
+
或
-
,以更改設定。
3. 設定的順序如下:12/24小時格式、小時和
分鐘。
鬧鐘
欲設定鬧鐘︰
1. 按住
設定
或 。
2. 按
+
/
-
, 設定小時/分鐘。
3. 按
設定
(或10秒無動作後)返回時鐘模式顯示。
欲啟動/停止啟動鬧鐘:
滑動至︰
•
關閉
- 停止啟動鬧鐘
•
嗶
- 嗶聲鬧鐘
•
收音機
- 收音機鬧鐘
欲關閉鬧鐘聲音 :
•
按
貪睡功能/睡眠
,可關閉鬧鐘聲音8分鐘。或
•
按
設定
,
設定
/
、
+
/
-
,以關閉鬧鐘
並在24小時後再次開啟鬧鐘。
收音機
欲啟動/停止啟動收音機:
1. 滑動
收音機開啟 / 關閉
,以啟動收音機。
2. 轉動
調頻
旋轉指針,選取調頻。
欲調整音量:
•
轉動
音量
旋轉指針至靜音 / 調整音量。
欲啟動睡眠計時器︰
•
按
貪睡功能/睡眠
,進入睡眠模式。
•
按
貪睡功能/睡眠
,變更睡眠時間設定(120、
90、60、30、15、0分鐘) 。
投射
本機體提供便捷的報時資訊。
欲連續投射︰
•
連�變壓器時,將投射��滑動至開啟,以啟
連�變壓器時,將投射��滑動至開啟,以啟
動/停止啟動連續投射。
欲180°旋轉投射的影像︰
•
按180°旋轉。
欲對焦影像︰
•
轉動焦距轉盤。
註
投射已照射後,請勿直�望向投影機內部。
重設
按
重設
返回預設設定。
警告
•
請勿對主機體猛力施壓、撞擊,或將主機放置
在大量灰塵、溫度或濕度變化大的地方。
•
請勿用報紙、窗簾等物品蓋住通孔。
•
請勿將機體浸水。若不慎將機體沾水,立即使
用柔軟、不含麻質的布擦拭。
•
請勿使用磨損或腐蝕性的物質清潔機體。
•
不要干擾內部零件。此舉將終止產品保養。
•
請僅用新電池。不要混合使用新、舊電池。
•
手冊中顯示的圖像可能與實際產品不符。
1
2
3
4
5
6
1
2
1
2
3
4
5
6
EN
中文(繁)
Downloaded from
manuals search engine
„Anleitung wird geladen“ bedeutet, dass Sie warten müssen, bis die Datei vollständig geladen ist und Sie sie online lesen können. Einige Anleitungen sind sehr groß, und die Zeit, bis sie angezeigt wird, hängt von Ihrer Internetgeschwindigkeit ab.