Electrolux XXLBOX14 - Bedienungsanleitung - Seite 67
 2
2
 3
3
 4
4
 5
5
 6
6
 7
7
 8
8
 9
9
 10
10
 11
11
 12
12
 13
13
 14
14
 15
15
 16
16
 17
17
 18
18
 19
19
 20
20
 21
21
 22
22
 23
23
 24
24
 25
25
 26
26
 27
27
 28
28
 29
29
 30
30
 31
31
 32
32
 33
33
 34
34
 35
35
 36
36
 37
37
 38
38
 39
39
 40
40
 41
41
 42
42
 43
43
 44
44
 45
45
 46
46
 47
47
 48
48
 49
49
 50
50
 51
51
 52
52
 53
53
 54
54
 55
55
 56
56
 57
57
 58
58
 59
59
 60
60
 61
61
 62
62
 63
63
 64
64
 65
65
 66
66
 67
67
 68
68
 69
69
 70
70
 71
71
 72
72
 73
73
 74
74
 75
75
 76
76
 77
77
 78
78
 79
79
 80
80
 81
81
 82
82
 83
83
 84
84
 85
85
 86
86
 87
87
 88
88
 89
89
 90
90
 91
91
 92
92
 93
93
 94
94
 95
95
 96
96
 97
97
 98
98
 99
99
 100
100
 101
101
 102
102
 103
103
Inhalt:
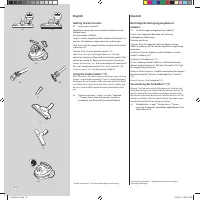
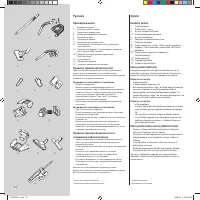
- Seite 8 – English; Before starting; Deutsch; Vorbereitungen
- Seite 10 – Getting the best results.; Bestmögliche Reinigungsergebnisse
- Seite 16 – feature; Replacing the ErgoboxTM with the dust bag.; verwenden; Die ErgoboxTM durch Staubbeutel ersetzen.
- Seite 18 – Replacement of the exhaust filter*; Filterwechsel
- Seite 20 – Cleaning the hose and nozzle; Cleaning the floor nozzle; Reinigung des Schlauches und der Düsen; Reinigung der Bodendüse
- Seite 22 – Troubleshooting; „Was tun wenn ... „
67
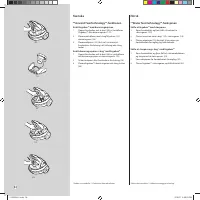
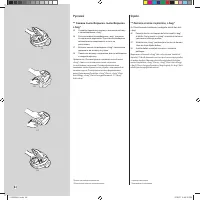
Română
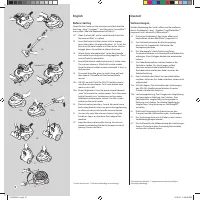
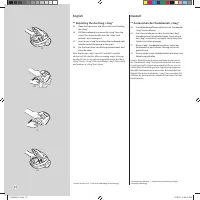
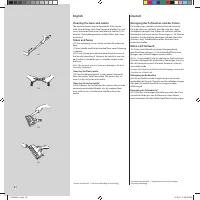
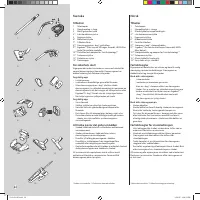
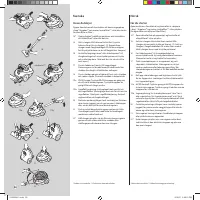
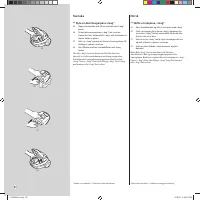
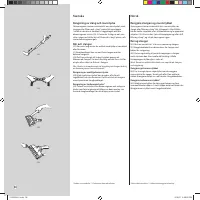
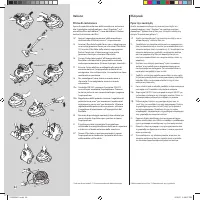
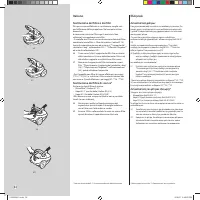
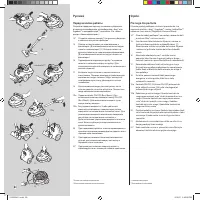
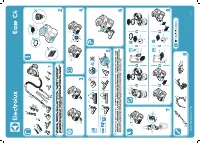
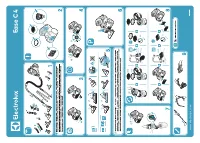
** Înlocuirea pungii de praf, s-bag®
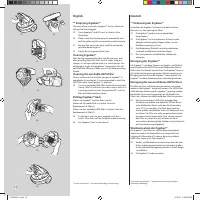
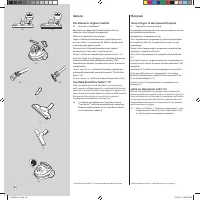
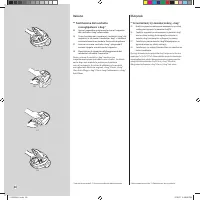
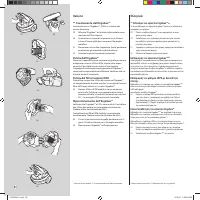
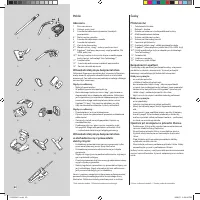
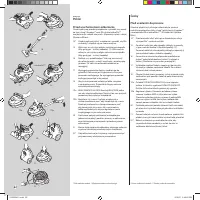
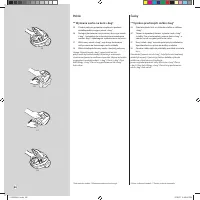
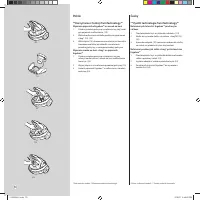
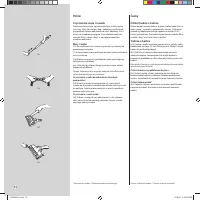
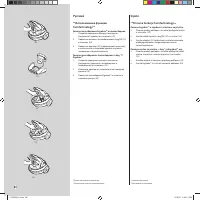
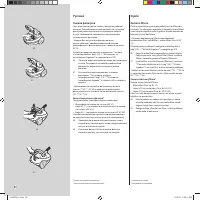
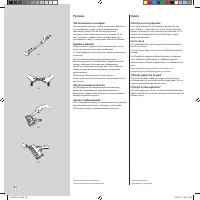
25 Deschideţi capacul frontal şi ridicaţi de garnitura care
susţine punga s-bag®.
26 Trageţi cartonul pentru a îndepărta punga s-bag® din
garnitură. Acesta va sigila automat punga s-bag® şi
va împiedica împrăştierea prafului.
27 Introduceţi o nouă pungă s-bag® împingând cartonul
în capătul canalului de pe garnitură.
28 Aşezaţi garnitura în compartimentul pungii şi
închideţi capacul.
Notă: Înlocuiţi punga s-bag® chiar dacă nu este plină (s-ar
putea să fie blocată). De asemenea, trebuie să o schimbaţi şi
după ce aţi aspirat pudră de curăţare carpete. Asiguraţi-vă că
folosiţi doar pungi de praf original Electrolux, s-bag® Classic,
s-bag® Clinic Anti-Allergy, s-bag® Classic long performance
sau s-bag® Anti-odour.
* Disponibil numai pentru unele modele.
** Execuţie în funcţie de tehnologie
* Le določeni modeli. **Izvedba je odvisna od tehnologije.
* Csak egyes típusokhoz. **Technológiától függő alkalmazás
Slovensky
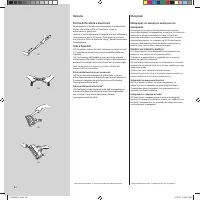
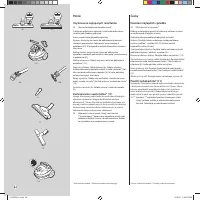
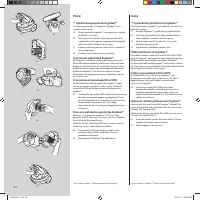
** Zamenjava vrečke za prah, s-bag®
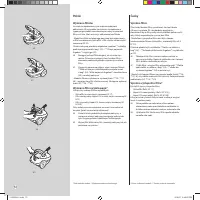
25 Odprite sprednji pokrov in odstranite vstavek, ki
vsebuje vrečko s-bag®.
26 Povlecite za prijemalo iz lepenke, tako da odstranite
vrečko s-bag® iz vstavka. Tako se vrečka s-bag®
samodejno zapre, kar prepreči uhajanje prahu.
27 Novo vrečko s-bag® vstavite tako, da potisnete
prijemalo iz lepenke v režo vstavka.
28 Nosilec vrečke postavite nazaj v ležišče za vrečko in
zaprite pokrov.
Opomba: Vrečko s-bag® zamenjajte tudi, če ni popolnoma
polna (morda je zamašena). Zamenjajte jo tudi po sesanju
praška za čiščenje preprog. Uporabljajte le originalne
Electroluxove vrečke za prah, standardne vrečke s-bag®
Classic, klinične vrečke s-bag® Clinic Anti-Allergy, sintetične
vrečke s-bag® Classic long performance ali karbonske vrečke
s-bag® Anti-odour
.
Magyar
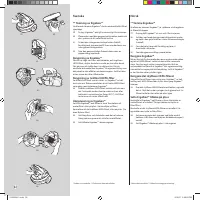
**Az s-bag® porzsák cseréje
25 Nyissa ki a készülék elülső fedelét, és vegye ki az
s-bag® porzsák tartóelemét.
26 Az s-bag® porzsák tartóelemből való eltávolításához
húzza a kartonlemezt kifelé. Ezzel az s-bag® porzsák
is automatikusan lezáródik, így nem szóródik ki a por.
27 Helyezze be az új s-bag® porzsákot: nyomja a
kartonlemezt egyenesen a tartóelem hátsó részén
található vágatba.
28 Helyezze vissza a tartóelemet a porzsáktartó
rekeszbe, és zárja be a fedelet.
Megjegyzés: Az s-bag® porzsákot akkor is cserélje ki, ha
nincs még tele (el is dugulhatott). Por állagú szőnyegtisztító
porszívózása után is cserélje ki. Csakis eredeti Electrolux
porzsákot használjon: s-bag® Classic, s-bag® Clinic, s-bag®
Classic long performance , s-bag®Anti-Allergy vagy s-bag®
Anti-odour.
2192924-01.indd 67
2/13/07 4:40:04 PM
„Anleitung wird geladen“ bedeutet, dass Sie warten müssen, bis die Datei vollständig geladen ist und Sie sie online lesen können. Einige Anleitungen sind sehr groß, und die Zeit, bis sie angezeigt wird, hängt von Ihrer Internetgeschwindigkeit ab.
Zusammenfassung
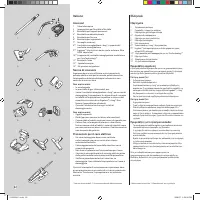
8 * Certain models only. ** Execution depending on technology English Before starting Open the front cover on the machine and check that the dust bag, s-bag® / Ergobox™ , and the motor-/microfilter** are in place. (See also Replacement of filter(s))14* Open the back lid* on the machine and check tha...
10 * Certain models only. ** Execution depending on technology English Getting the best results. 23 Accessories on board*Upholstery nozzle and crevice nozzle to be found under foldable cover. Use the nozzles as follows: Carpets: Use the carpet/hard floor nozzle with the lever* in position (40). Redu...
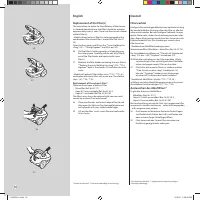
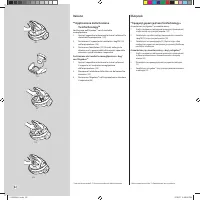
16 * Certain models only. ** Execution depending on technology English **Apply TwinTechnology TM feature Replacing the Ergobox™ with the dust bag. 1. Open the front cover and remove (lift out) the box from the cleaner. ( 29) 2. Place the insert holding the s-bag® (10) into the cleaner. (28) 3. Place...
Weitere Modelle Staubsauger Electrolux
-
 Electrolux EC41-2SW
-
 Electrolux EC41-4T
-
 Electrolux EC41-ANIM
-
 Electrolux EC41-H2SW
-
 Electrolux EER73DB
-
 Electrolux EER73IGM
-
 Electrolux PC91-8STM
-
 Electrolux PC91-ALRG
-
 Electrolux PD91-8SSM
-
 Electrolux UCORIGIN