Electrolux XXLBOX14 - Bedienungsanleitung - Seite 13
 2
2
 3
3
 4
4
 5
5
 6
6
 7
7
 8
8
 9
9
 10
10
 11
11
 12
12
 13
13
 14
14
 15
15
 16
16
 17
17
 18
18
 19
19
 20
20
 21
21
 22
22
 23
23
 24
24
 25
25
 26
26
 27
27
 28
28
 29
29
 30
30
 31
31
 32
32
 33
33
 34
34
 35
35
 36
36
 37
37
 38
38
 39
39
 40
40
 41
41
 42
42
 43
43
 44
44
 45
45
 46
46
 47
47
 48
48
 49
49
 50
50
 51
51
 52
52
 53
53
 54
54
 55
55
 56
56
 57
57
 58
58
 59
59
 60
60
 61
61
 62
62
 63
63
 64
64
 65
65
 66
66
 67
67
 68
68
 69
69
 70
70
 71
71
 72
72
 73
73
 74
74
 75
75
 76
76
 77
77
 78
78
 79
79
 80
80
 81
81
 82
82
 83
83
 84
84
 85
85
 86
86
 87
87
 88
88
 89
89
 90
90
 91
91
 92
92
 93
93
 94
94
 95
95
 96
96
 97
97
 98
98
 99
99
 100
100
 101
101
 102
102
 103
103
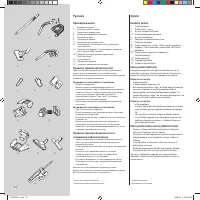
Inhalt:
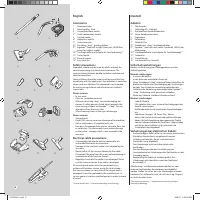
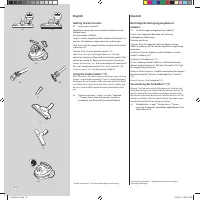
- Seite 8 – English; Before starting; Deutsch; Vorbereitungen
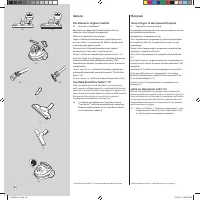
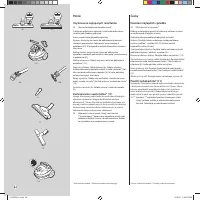
- Seite 10 – Getting the best results.; Bestmögliche Reinigungsergebnisse
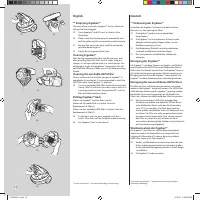
- Seite 16 – feature; Replacing the ErgoboxTM with the dust bag.; verwenden; Die ErgoboxTM durch Staubbeutel ersetzen.
- Seite 18 – Replacement of the exhaust filter*; Filterwechsel
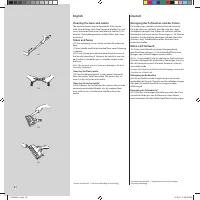
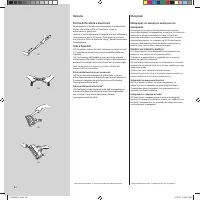
- Seite 20 – Cleaning the hose and nozzle; Cleaning the floor nozzle; Reinigung des Schlauches und der Düsen; Reinigung der Bodendüse
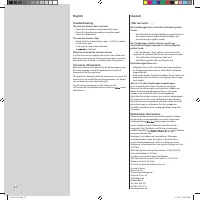
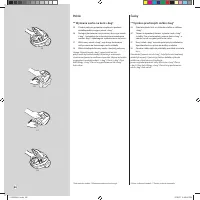
- Seite 22 – Troubleshooting; „Was tun wenn ... „
1
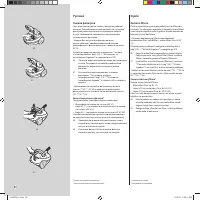
Español
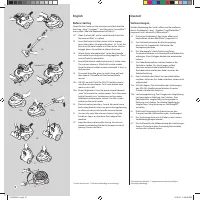
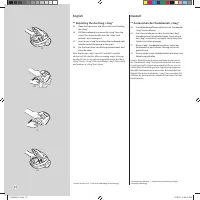
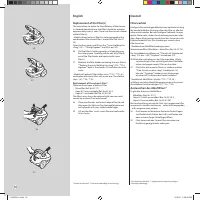
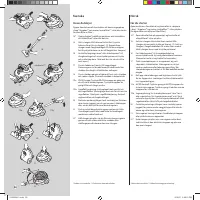
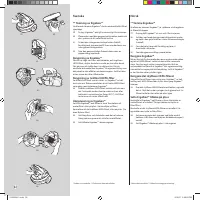
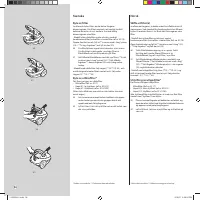
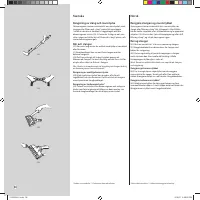
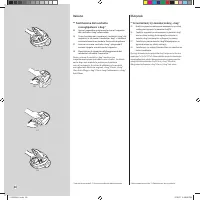
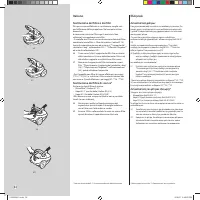
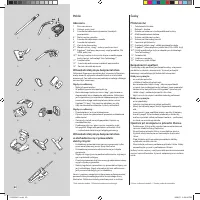
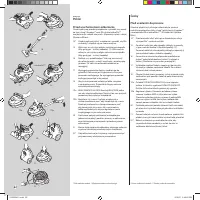
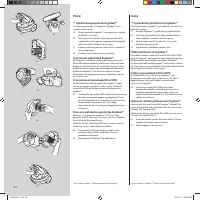
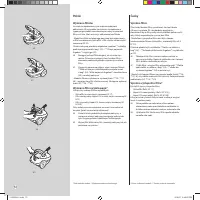
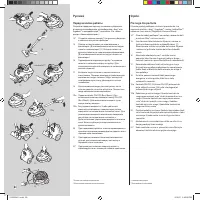
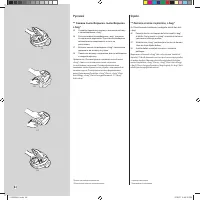
** Cambio de la bolsa s-bag®
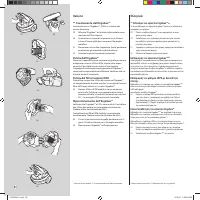
25 Abra la tapa delantera y saque el compartimento
que contiene la bolsa s-bag®.
26 Tire del cartón para sacar la bolsa s-bag® del
compartimento. De esta forma, la s-bag® se sella
automáticamente y se evita que salga polvo hacia el
exterior.
27 Introduzca una nueva bolsa s-bag® empujando el
soporte de cartón hasta el fondo de la ranura del
compartimento.
28 Vuelva a introducir el compartimento y cierre la tapa.
Nota: cambie la bolsa s-bag® aunque no esté llena (podría
estar obstruida). Si aspira polvo de limpieza para alfombras
también deberá cambiar la bolsa. Utilice únicamente
las siguientes bolsas para polvo originales de Electrolux:
s-bag® Classic, s-bag® Clinic Anti-Allergy, s-bag® Classic long
performance o s-bag® Anti-odour.
*Solo algunos modelos **Realización en función de la tecnología
Français
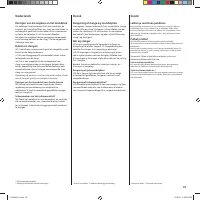
** Remplacer le sac à poussière s-bag®
25 Ouvrir le couvercle avant et soulever le support de
fixation du sac à poussière s-bag®.
26 Tirer sur la partie cartonnée pour retirer le sac à
poussière s-bag® du support de fixation. Le sac à
poussière se ferme alors automatiquement pour
empêcher la poussière de se diffuser dans l'air.
27 Insérer un nouveau sac à poussière s-bag® en
poussant la partie cartonnée bien au fond du rail du
support de fixation.
28 Remettre en place le support de fixation dans le
compartiment sac et fermer le couvercle.
Remarque : Remplacer le sac à poussière s-bag® même s'il
n'est pas plein (il peut être obstrué). Le remplacer également
après avoir utilisé de la poudre de nettoyage pour moquettes.
Veiller à n'utiliser que des sacs à poussière originaux
Electrolux, s-bag® Classic, s-bag® Clinic Anti-Allergy, s-bag®
ClassicLong Performance ou s-bag® Anti-odour.
* Suivant les modèles. ** Exécution suivant le type de produit
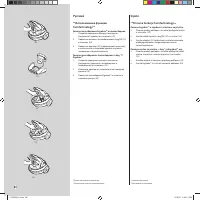
Português
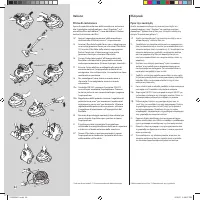
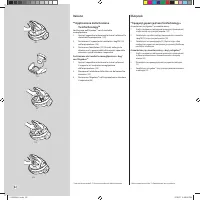
** Substituição do saco do pó s-bag®
25 Abra a tampa frontal e retire o encaixe que segura o
s-bag®.
26 Puxe o cartão para remover o s-bag® do encaixe. Esta
acção fecha automaticamente o s-bag® e impede
perdas de pó.
27 Insira um s-bag® novo puxando o cartão até ao fim
da ranhura do encaixe.
28 Coloque novamente o encaixe no compartimento do
saco e feche a tampa.
Nota. Substitua o s-bag® mesmo que não esteja cheio (poderá
estar obstruído). Substitua igualmente após aspirar pó de
limpeza de tapetes. Certifique-se de que utiliza apenas sacos
de pó, s-bag® Classic, s-bag® Clinic Anti-Alergias, s-bag® Longa
Duração ou s-bag® Anti-odour.
* Apenas em alguns modelos. **A execução depende da tecnologia
2192924-01.indd 13
2/13/07 4:39:47 PM
„Anleitung wird geladen“ bedeutet, dass Sie warten müssen, bis die Datei vollständig geladen ist und Sie sie online lesen können. Einige Anleitungen sind sehr groß, und die Zeit, bis sie angezeigt wird, hängt von Ihrer Internetgeschwindigkeit ab.
Zusammenfassung
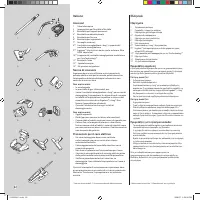
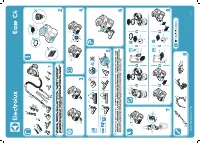
8 * Certain models only. ** Execution depending on technology English Before starting Open the front cover on the machine and check that the dust bag, s-bag® / Ergobox™ , and the motor-/microfilter** are in place. (See also Replacement of filter(s))14* Open the back lid* on the machine and check tha...
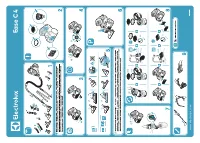
10 * Certain models only. ** Execution depending on technology English Getting the best results. 23 Accessories on board*Upholstery nozzle and crevice nozzle to be found under foldable cover. Use the nozzles as follows: Carpets: Use the carpet/hard floor nozzle with the lever* in position (40). Redu...
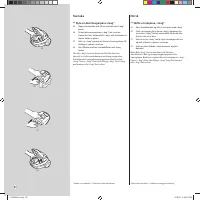
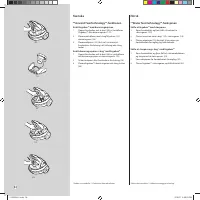
16 * Certain models only. ** Execution depending on technology English **Apply TwinTechnology TM feature Replacing the Ergobox™ with the dust bag. 1. Open the front cover and remove (lift out) the box from the cleaner. ( 29) 2. Place the insert holding the s-bag® (10) into the cleaner. (28) 3. Place...
Weitere Modelle Staubsauger Electrolux
-
 Electrolux EC41-2SW
-
 Electrolux EC41-4T
-
 Electrolux EC41-ANIM
-
 Electrolux EC41-H2SW
-
 Electrolux EER73DB
-
 Electrolux EER73IGM
-
 Electrolux PC91-8STM
-
 Electrolux PC91-ALRG
-
 Electrolux PD91-8SSM
-
 Electrolux UCORIGIN