Important information – Fig. 1 - Bosch HBG6725S1I - Bedienungsanleitung - Seite 3


- 3 -
Aufgrund des notwendigen Mindestabstandes
b
ergibt sich die
mindeste Arbeitsplattenstärke
a
.
Die Montageanleitung des Kochfeldes beachten.
Gerät im Hochschrank - Bild 3
Zur Belüftung des Gerätes müssen die Zwischenböden einen Lüf
-
tungsausschnitt aufweisen.
Wenn der Hochschrank zusätzlich zu den Element-Rückwänden
eine weitere Rückwand hat, muss diese entfernt werden.
Gerät nur so hoch einbauen, dass Zubehör problemlos entnom
-
men werden kann.
Eckeinbau - Bild 4
Damit die Gerätetür geöffnet werden kann, beim Eckeinbau Maße
C
berücksichtigen. Das Maß
D
ist abhängig von der Dicke der
Möbelfront unter dem Griff.
Gerät elektrisch anschließen
Das Gerät entspricht der Schutzklasse I und darf nur mit Schutzlei
-
ter-Anschluss betrieben werden.
Die Absicherung muss gemäß der Leistungsangabe auf dem
Typenschild und den lokalen Vorschriften erfolgen.
Bei allen Montagearbeiten muss das Gerät spannungslos sein.
Das Gerät darf nur mit der mitgelieferten Anschlussleitung ange
-
schlossen werden. Stecken Sie die Anschlussleitung an der Gerä
-
terückseite an (Click!).
Eine 3,0m-Anschlussleitung ist beim Kundendienst erhältlich.
Die Anschlussleitung darf nur durch eine Originalleitung, bezieh
-
bar über den Kundendienst, ersetzt werden.
Der Berührungsschutz muss durch den Einbau gewährleistet sein.
Anschlussleitung mit Schutzkontakt-Stecker
Das Gerät darf nur an eine vorschriftsmäßig installierte Schutzkon
-
takt-Steckdose angeschlossen werden.
Wenn der Stecker nach dem Einbau nicht mehr erreichbar ist,
muss in der festverlegten elektrischen Installation eine Trennvor
-
richtung in den Phasen nach den Errichtungsbestimmungen vor
-
gesehen werden.
Anschlussleitung ohne Schutzkontakt-Stecker
Nur ein konzessionierter Fachmann darf das Gerät anschließen.
In der festverlegten elektrischen Installation ist eine Trennvorrich
-
tung in den Phasen nach den Errichtungsbestimmungen vorzuse
-
hen. Phase- und Neutral- (“Null-“) Leiter in der Anschlussdose
identifizieren. Bei Falschanschluss kann das Gerät beschädigt
werden.
Nur nach Anschlussbild anschließen. Spannung siehe Typen
-
schild. Die Adern der Netzanschlussleitung entsprechend der
Farbcodierung anschließen: grün-gelb = Schutzleiter
<
, blau =
(Null) Neutral-Leiter, braun = Phase (Außenleiter).
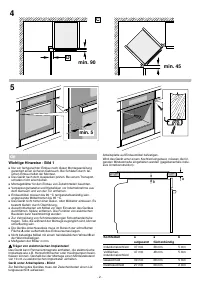
Gerät befestigen - Bild 5
1.
Gerät ganz einschieben und mittig ausrichten.
2.
Gerät festschrauben.
Der Spalt zwischen Arbeitsplatte und Gerät darf nicht durch
zusätzliche Leisten verschlossen werden.
An den Seitenwänden des Umbauschrankes dürfen keine Wärme
-
schutzleisten angebracht werden.
Ausbau
1.
Gerät spannungslos machen.
2.
Befestigungsschrauben lösen.
3.
Gerät leicht anheben und ganz herausziehen
en
Ú
Installation instructions
Important information – Fig. 1
■
The safe operation of this appliance can only be guaranteed if it
has been installed to a professional standard in accordance with
these installation instructions. The installer shall be liable for any
damage resulting from incorrect installation.
■
Check the appliance for damage after unpacking it. Do not
connect the appliance if it has been damaged in transit.
■
Proceed in accordance with the installation sheets for installing
accessories.
■
Before starting up the appliance, remove any packaging material
and adhesive film from the cooking compartment and the door.
■
Fitted units must be heat-resistant up to 90 °C, and adjacent
unit fronts up to 65 °C.
■
Do not install the appliance behind a decorative door or the door
of a kitchen unit, as this may cause the appliance to overheat.
■
Any cut-outs that need to be made in the units should be made
before the appliance is installed. Remove any shavings, as they
may prevent the electrical components from working properly.
■
Wear protective gloves so that you do not cut yourself.Parts that
are accessible during installation may have sharp edges.
■
The mains socket for the appliance must either be located in the
hatched area
A
or outside of the area where the appliance is
installed.
■
Secure any unsecured units to the wall using a standard bracket
B
.
■
The dimensions in the figures are in mm.
:
Wearers of electronic implants!
The appliance may contain permanent magnets which may affect
electronic implants, e.g. heart pacemakers or insulin pumps.
Therefore, during installation, wearers of electronic implants must
maintain a minimum distance of 10 cm from the appliance.
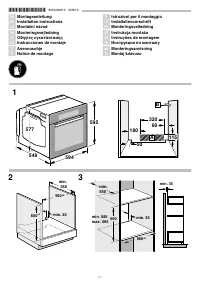
Appliance under worktop – fig. 2
To ventilate the appliance, the intermediate floor must have a
ventilation cut-out.
Secure the worktop to the fitted units.
If the appliance is installed under a hob, the following minimum
dimensions must be adhered to (including substructure, if
applicable):
The minimum worktop thickness
a
is based on the required
minimum clearance
b
.
Proceed in accordance with the installation instructions for the
hob.
Appliance in a tall unit - Fig. 3
To ventilate the appliance, the intermediate floors must have a
ventilation cut-out.
If the tall unit has another back panel in addition to the element
back panels, this must be removed.
Only fit the appliance up to a height which allows accessories to be
easily removed.
Corner installation – Fig. 4
To ensure that the appliance door can be opened in a corner
installation, take account of dimension
C
. Dimension
D
is
dependent on the thickness of the unit front under the handle.
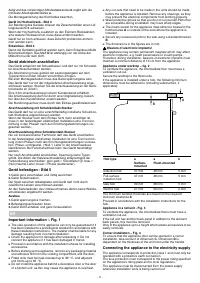
Connecting the appliance to the electricity supply
The appliance corresponds to protection class 1 and must only be
operated with a protective earth connection.
The fuse protection must correspond to the power rating specified
on the appliance's rating plate and to local regulations.
The appliance must be disconnected from the power supply
whenever installation work is being carried out.
Hob type
a
Surface-
mounted
a
Flush-mounted
b
Induction hob
37 mm
38 mm
5 mm
Full-surface
induction hob
47 mm
48 mm
5 mm
Gas hob
30 mm
38 mm
5 mm
Electric hob
27 mm
30 mm
2 mm
D
E
„Anleitung wird geladen“ bedeutet, dass Sie warten müssen, bis die Datei vollständig geladen ist und Sie sie online lesen können. Einige Anleitungen sind sehr groß, und die Zeit, bis sie angezeigt wird, hängt von Ihrer Internetgeschwindigkeit ab.